How to control aux heater?: Unterschied zwischen den Versionen
André (Diskussion | Beiträge) K |
André (Diskussion | Beiträge) K |
||
| Zeile 4: | Zeile 4: | ||
<br /> | <br /> | ||
Check German Version: [[Wie kann ich die Standheizung steuern?]] | Check German Version: [[Wie kann ich die Standheizung steuern?]] | ||
| + | <br /> | ||
| + | <br /> | ||
| + | == Control by I-BUS app == | ||
| + | <br /> | ||
| + | Wenn sicher gestellt ist, dass die STH vorhanden und mit dem Original-Radio/Navi ansteuerbar war, kann die Option "Standheizung" in den weiteren Einstellungen der I-BUS App aktiviert werden.<br /> | ||
| + | === Steuerung mit ehemals Navigations-System ab Werk === | ||
| + | <br /> | ||
| + | Stelle sicher, dass die Option "MID Abfragen emulieren" '''NICHT''' aktiviert und die Option "Standheizung" aktiviert ist.<br /> | ||
| + | <br /> | ||
| + | Es erscheint danach auf dem Reiter "Control" und dem Eintrag "Standlüftung" auch der Eintrag "Standheizung". Über den Slider daneben kann die STH (oder STL) direkt gestartet werden.<br /> | ||
| + | Darüber befinden sich zwei Timer, für die eine Startzeit gestellt werden kann.<br /> | ||
| + | Ist der Timer erfolgreich gestellt, so kann man im Tacho mit großem Textdisplay (sofern die PROG-Funktion "ZEIT1" und "ZEIT2" aktiv sind) die entsprechende Startzeit aufrufen, welche mit einem Stern markiert ist.<br /> | ||
| + | Der Timer ist damit erfolgreich gesetzt. Den Start der STH übernimmt das Kombi-Instrument zur eingestellten Zeit.<br /> | ||
| + | <gallery mode="packed-hover"> | ||
| + | Low BC calc-MID Emulation.png|Richtige Einstellung für Low BC Berechnung und MID Emulation | ||
| + | 00_IBUS-App_Control.png|Startseite Control | ||
| + | 9_IBUS-App_Ansteuern1.png|Zeiteinstellung Standheizung/-lüftung | ||
| + | </gallery><br /> | ||
| + | <br /> | ||
| + | === Steuerung mit ehemals nur Radio ab Werk === | ||
| + | <br /> | ||
| + | Stelle sicher, dass die Option "MID Abfragen emulieren" und die Option "Standheizung" aktiviert sind.<br /> | ||
| + | <br /> | ||
| + | Auf dem Reiter "Control" erscheint nun ein großer Button "MID". Nach dem dieser betätigt wird erscheint ein emuliertes MID, so wie es zuvor bekannt war. Unter "Clock" erreicht man das Menü zum setzen der "ZEIT1" oder "ZEIT2". Nach erfolgreich gesetzter Startzeit wird vor "Zeit1"/"ZEIT2" ein Stern gesetzt. | ||
| + | <gallery mode="packed-hover"> | ||
| + | 00_IBUS-App_Control_MID_08.png|Umstellung auf "MID Emulation aktiv" (wenn zuvor MID verbaut war!) | ||
| + | Low BC calc-MID Emulation.png|Richtige Einstellung für Low BC Berechnung und MID Emulation | ||
| + | 00 IBUS-App Control MID.png|MID Start-Button | ||
| + | 00_IBUS-App_Control_MID_01.png|Start-Seite MID Control | ||
| + | 00_IBUS-App_Control_MID_02.png|MID - Clock | ||
| + | 00_IBUS-App_Control_MID_03.png|MID - Zeit 1 und 2 | ||
| + | 00_IBUS-App_Control_MID_05.png|MID - Zeit 1 stellen | ||
| + | </gallery><br /> | ||
| + | == Control by orange Resler Module == | ||
| + | <br /> | ||
<font color="red"><big>'''NOTE: If the function is set to auxiliary heating on vehicles WITHOUT auxiliary heating and this is started, malfunctions will occur. Often the fan is started and cannot be stopped unless the vehicle battery is disconnected. Therefore make sure that a auxiliary heating is installed.'''</big> </font> <br /> | <font color="red"><big>'''NOTE: If the function is set to auxiliary heating on vehicles WITHOUT auxiliary heating and this is started, malfunctions will occur. Often the fan is started and cannot be stopped unless the vehicle battery is disconnected. Therefore make sure that a auxiliary heating is installed.'''</big> </font> <br /> | ||
<font color="red"><big>An indication of an installed auxiliary heater can(!) be a sticker of the manufacturer "Webasto" in the engine compartment on the left dome. However this is also present if only one auxiliary heater is coded on diesel vehicles.</big> </font> | <font color="red"><big>An indication of an installed auxiliary heater can(!) be a sticker of the manufacturer "Webasto" in the engine compartment on the left dome. However this is also present if only one auxiliary heater is coded on diesel vehicles.</big> </font> | ||
Version vom 7. Dezember 2022, 08:22 Uhr
- side under construction -
Check German Version: Wie kann ich die Standheizung steuern?
Inhaltsverzeichnis
Control by I-BUS app
Wenn sicher gestellt ist, dass die STH vorhanden und mit dem Original-Radio/Navi ansteuerbar war, kann die Option "Standheizung" in den weiteren Einstellungen der I-BUS App aktiviert werden.
Stelle sicher, dass die Option "MID Abfragen emulieren" NICHT aktiviert und die Option "Standheizung" aktiviert ist.
Es erscheint danach auf dem Reiter "Control" und dem Eintrag "Standlüftung" auch der Eintrag "Standheizung". Über den Slider daneben kann die STH (oder STL) direkt gestartet werden.
Darüber befinden sich zwei Timer, für die eine Startzeit gestellt werden kann.
Ist der Timer erfolgreich gestellt, so kann man im Tacho mit großem Textdisplay (sofern die PROG-Funktion "ZEIT1" und "ZEIT2" aktiv sind) die entsprechende Startzeit aufrufen, welche mit einem Stern markiert ist.
Der Timer ist damit erfolgreich gesetzt. Den Start der STH übernimmt das Kombi-Instrument zur eingestellten Zeit.

Richtige Einstellung für Low BC Berechnung und MID Emulation

Startseite Control

Zeiteinstellung Standheizung/-lüftung


Steuerung mit ehemals nur Radio ab Werk
Stelle sicher, dass die Option "MID Abfragen emulieren" und die Option "Standheizung" aktiviert sind.
Auf dem Reiter "Control" erscheint nun ein großer Button "MID". Nach dem dieser betätigt wird erscheint ein emuliertes MID, so wie es zuvor bekannt war. Unter "Clock" erreicht man das Menü zum setzen der "ZEIT1" oder "ZEIT2". Nach erfolgreich gesetzter Startzeit wird vor "Zeit1"/"ZEIT2" ein Stern gesetzt.

Umstellung auf "MID Emulation aktiv" (wenn zuvor MID verbaut war!)
Richtige Einstellung für Low BC Berechnung und MID Emulation

MID Start-Button

Start-Seite MID Control

MID - Clock

MID - Zeit 1 und 2

MID - Zeit 1 stellen


Control by orange Resler Module
NOTE: If the function is set to auxiliary heating on vehicles WITHOUT auxiliary heating and this is started, malfunctions will occur. Often the fan is started and cannot be stopped unless the vehicle battery is disconnected. Therefore make sure that a auxiliary heating is installed.
An indication of an installed auxiliary heater can(!) be a sticker of the manufacturer "Webasto" in the engine compartment on the left dome. However this is also present if only one auxiliary heater is coded on diesel vehicles.

settings auxiliary heating/ventilation
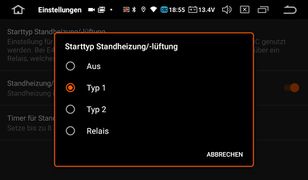
types of auxiliary heating/ventilation


The Resler module can perform the control of the auxiliary heating/ventilation.
Initially the type must be defined (especially for control via remote control).
| OFF | There is NO control of the auxiliary heating/ventilation. |
| type 1 | Only for E38/E39/E53 with high BC speeedometer |
| type 2 | E38/E39/E53 with Low BC speeedometer |
| relay | In the E46/E83/E85 the auxiliary heating is controlled via +12V switching signal instead of via the BUS system. With retrofitting a relay (not included) a relay may be switched via ground signal on the green wire from the Resler module. |
To decide which type to set, please check: Habe ich High oder Low BC?
Direct start of the auxiliary heating/ventilation via remote control
The remote control in the vehicle key can be used to start/stop the auxiliary heating/ventilation directly.
Use the slider to determine whether the auxiliary heating or auxiliary ventilation is to be used.
| Starting auxiliary heating/ventilation | The vehicle has to be locked. Press and hold the close button on the key for approximately 2 seconds. The start is confirmed visually by 2x "slow flashing". |
| Stop auxiliary heating/ventilation | The vehicle has to be locked and the auxiliary heating/ventilation has to be running. Press and hold the close button on the key for approx. 2 seconds. The stop is confirmed visually by 3x "slow flashing". Note: The auxiliary heating cools down with the combustion air fan for approx. 180s so that it does not stop immediately. |
Timer control for auxiliary heating/ventilation
The Resler Module allows pre-programming of up to 8 timers with a lead time of up to one week and weekly repetition beyond that.
| Example | Example |
| activate/ deactivate timer | Set the slider accordingly. After the timer has run, it is deactivated. |
| Start time | Set the start time for the timer |
| Duration | Setting the duration of the timer (1-30 minutes) |
| Days | Set the days on which the timer should be active |
| Weekly repetition | The complete timer is repeated continuously every week as it is set. The option also has to be set if the timer shall run on more than one day. Otherwise the timer will be deactivated after the first run. |
| Functional type | The type can be set to auxiliary heating/ventilation or relay. The air-conditioning control unit decides whether ventilation or heating is required based on the outside temperature (16°C is the switchover point). |
NOTE: Since the air conditioning control unit decides which function is to be implemented the timer can usually always be used for the auxiliary ventilation function (except E46/E83/E85) even if no auxiliary heating is installed.

Auxiliary heating/ventilation - timer overview

Auxiliary heating/ventilation - timer settings

