Resler Module Configurator: Unterschied zwischen den Versionen
André (Diskussion | Beiträge) (Die Seite wurde neu angelegt: „<br /> With the '''Resler Module Configurator''' (current version: 0.9.29) you may comfortably configure all functions of the Resler Module on your desk at the…“) |
André (Diskussion | Beiträge) K |
||
| Zeile 62: | Zeile 62: | ||
[[Habe ich High oder Low BC?]]<br /><br /> | [[Habe ich High oder Low BC?]]<br /><br /> | ||
| − | === | + | === Heating/ventilator === |
| − | <font color="red"><big>''' | + | <font color="red"><big>'''NOTE: If the function is set to auxiliary heating on vehicles WITHOUT auxiliary heating and this is started a malfunctions will occur. Often the fan is started and can only be stopped by disconnecting the vehicle battery. Therefore make sure that a parking heater is installed.'''</big> </font> <br /> |
| − | <font color="red"><big> | + | <font color="red"><big>An indication of an installed auxiliary heater may(!) be a sticker of the company "Webasto" in the engine compartment on the left dome. However this is also present if only an additional heater is coded in the case of diesel vehicles.</big> </font><br /> |
| − | + | Initially the type must be defined for this (especially for control via remote control). | |
{| class="wikitable" | {| class="wikitable" | ||
|- | |- | ||
| − | | ''' | + | | '''OFF'''|| There is NO control of the parking heater/parking heater ventilation |
|- | |- | ||
| − | | ''' | + | | '''Type 1'''|| Only for E38/E39/E53 with High BC speedometer |
|- | |- | ||
| − | | ''' | + | | '''Type 2'''|| E38/E39/E53 with Low BC speedometer |
|- | |- | ||
| − | | ''' | + | | '''Relay'''|| In the E46/E83/E85 the control is done via +12V switching signal instead of via the BUS system. By retrofitting a relay (not included) this can be switched via the ground signal on the green wire of the Resler module. |
|}<br /><br /> | |}<br /><br /> | ||
| − | === | + | === Mirrors === |
| − | * ''' | + | * '''Fold/Unfold Mirrors'': Sets the start conditions for the folding/unfolding of the mirrors. The following options are available: |
| − | ** | + | ** OFF |
| − | ** | + | ** Double-tapping the remote control |
| − | ** | + | ** Always active |
| − | * ''' | + | * '''Invert mirror unfolding'': If the mirrors fold in when unlocking, the function can be reversed here |
| − | * ''' | + | * '''Unfolding the mirrors when the ignition is switched on''': Unfolding of the (folded) mirrors only happens when ignition level 2 is switched on.<br /><br /> |
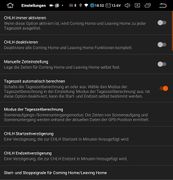
| − | + | == Coming/Leaving Home == | |
| − | + | <gallery mode="packed-hover"> | |
| − | + | RM Einstellungen CHLH 01.jpg|Settings for Coming/Leaving Home | |
| − | + | </gallery> | |
| + | Here you find the following functions: | ||
{| class="wikitable" | {| class="wikitable" | ||
|- | |- | ||
| − | | '''Coming Home | + | | '''Coming Home''' [CH]|| ("Home lights" - Lights up e.g. when locking the car) |
|- | |- | ||
| − | | ''' | + | | '''Leaving Home''' [LH]|| ("Welcome lights" - Lights up e.g. when unlocking the car) |
|} | |} | ||
| − | ''oder''<br /> | + | <br /> |
| − | ''' | + | We shorten both functions with "'''CHLH'''".<br /><br /> |
| + | === Starting time for CHLH === | ||
| + | CHLH may be '''always on''' oder '''always off''' .<br /> | ||
| + | ''or''<br /> | ||
| + | set '''start and end manually'''. Only if so underneath following items are shown: | ||
{| class="wikitable" | {| class="wikitable" | ||
|- | |- | ||
| − | | ''' | + | | '''Coming Home end time'''|| Time of day until CHLH is active<sup>1</sup> |
|- | |- | ||
| − | | ''' | + | | '''Coming Home start time'''|| Time of day from which on CHLH is active<sup>1</sup> |
| + | |} | ||
| + | ''or''<br /> | ||
| + | '''Automatically calculate the start/end time based on location, date and twilight type:''' | ||
| + | {| class="wikitable" | ||
|- | |- | ||
| − | | '''CHLH | + | | '''Daytime calculation mode<sup>2</sup>'''|| Sets the start/end time depending on the GPS position, date and twilight process (sunrise/sunset) when turn ignition off |
| + | |- | ||
| + | | '''CHLH start time delay'''|| Sets time difference "xx" before sunset/time of day calculation when CHLH should start <br />(Window: -120 ... +120 minutes, negative time moves the time forward, positive moves it backwards). | ||
| + | |- | ||
| + | | '''CHLH end time delay'''|| Sets time difference "yy" after sunset/time of day calculation when CHLH should end <br />(Window: -120 ... +120 minutes, negative time moves the time forward, positive moves it backwards). | ||
|} | |} | ||
| − | <sup>1</sup> | + | <sup>1</sup>unless "always active" or a "time of day calculation mode" is set<br /> |
| − | <sup>2</sup> | + | <sup>2</sup> Calculation options see table, calculated time incl. displacement is displayed in the status<br /> |
<br /> | <br /> | ||
{| class="wikitable" | {| class="wikitable" | ||
|- | |- | ||
| − | ! | + | ! Computation model !! Explanation |
|- | |- | ||
| − | | ''' | + | | '''No calculation of the day times'''|| Use of fixed times, always active or always off |
|- | |- | ||
| − | | ''' | + | | '''Sunrise/sunset'''|| Calculated sunrise and sunset |
|- | |- | ||
| − | | ''' | + | | '''Civil twilight'''|| Darkness beyond which it is no longer possible to work or read outside without artificial light. |
|- | |- | ||
| − | | ''' | + | | '''Nautical twilight'''|| Follow the civil twilight to the darkness beyond which you cannot yet see the stars. |
|- | |- | ||
| − | | ''' | + | | '''Astronomical twilight'''|| From this level of darkness, stars are visible in the sky |
|} | |} | ||
<gallery mode="packed-hover"> | <gallery mode="packed-hover"> | ||
| − | RM Einstellungen CHLH 04.jpg| | + | RM Einstellungen CHLH 04.jpg|twilight calculation |
| − | RM Einstellungen CHLH 03.jpg| | + | RM Einstellungen CHLH 03.jpg|comparison of twilight types |
</gallery><br /> | </gallery><br /> | ||
<br /> | <br /> | ||
| + | === Additional start/stop signals for CHLH === | ||
| + | In addition the following '''start/stop signals for CHLH''' can be defined: | ||
| + | {| class="wikitable" | ||
| + | |- | ||
| + | | '''CHLH Start/stop by ignition'''||Coming Home sequence begins with ignition off. Leaving Home sequence ends with ignition on (if it is still running). | ||
| + | |- | ||
| + | | '''Coming Home ''start'' when opening a door'''|| Coming Home sequence already starts with opening a door after switching off the ignition | ||
| + | |- | ||
| + | | '''Leaving Home ''stop'' when opening a door'''|| Stop the Leaving Home sequence with opening a door, if it is still running. | ||
| + | |- | ||
| + | | '''Activate CHLH in underground car park'''|| If this option is activated, CHLH is activated if the GPS signal is lost (takes about 60 seconds), e.g. in an underground car park. This means that the lights also start outside the set time if the GPS signal is missing. | ||
| + | |} | ||
| + | These functions are partly locked against each other so that they are mutually exclusive. | ||
| + | <gallery mode="packed-hover"> | ||
| + | RM Einstellungen CHLH 02.jpg|start signal CHLH | ||
| + | </gallery> | ||
| + | |||
| + | === Light sequences for Coming Home/Leaving Home === | ||
| + | The Resler Module has a microcontroller and a clock module so that it is possible to create light sequences for CHLH as desired.<br /> | ||
| + | A total of up to 100 sequences are possible, which can be divided between CH and LH as desired. | ||
| + | Setting the light sequence is done as already known via the menu [https://wiki.ibus-app.de/index.php?title=App_Einstellungen_v2#Lichtsteuerung light control]<br /> | ||
| + | <gallery mode="packed-hover"> | ||
| + | 9_IBUS-App_Lichtsteuerung1.png|Light selection | ||
| + | 9_IBUS-App_Lichtsteuerung2.png|Load light sequence | ||
| + | 9_IBUS-App_Lichtsteuerung3.png|import light sequence | ||
| + | 9_IBUS-App_Lichtsteuerung4.png|save light sequence | ||
| + | 9_IBUS-App_Lichtsteuerung5.png|export light sequence | ||
| + | 9_IBUS-App_Lichtsteuerung6.png|example for light sequence | ||
| + | </gallery> | ||
| + | '''Quick guide:'''<br /> | ||
| + | After creating/loading/importing the light sequence: | ||
| + | # Tap on „Save“ | ||
| + | # e.g. select memory slot 2 - 6 (memory slot 1 is intended in the app for "2x headlight flasher, not for CHLH). | ||
| + | # Confirm question for use as Coming/Leaving Home | ||
| + | # Select use for Coming OR Leaving Home | ||
| + | # Confirm "Send to Resler Module" | ||
| + | # Wait for successful writing to the Resler module, if an error occurs, restart at 1).<br /><br /> | ||
| + | |||
| + | === Download and insert sample light sequences for Coming Home/Leaving Home === | ||
| + | In '''Load'''', there is now also the '''Import''' from the Resler module or from the memory of the radio (e.g. with sequences created on the PC or [https://download.ibus-app.de/Lightshow/I-BUS_App_%20Lightshows.zip example sequences]). | ||
| + | <br /> | ||
| + | <br /> | ||
| + | ---- | ||
== Timer == | == Timer == | ||
<gallery mode="packed-hover"> | <gallery mode="packed-hover"> | ||
| − | RMC 07.jpg|Resler | + | RMC 07.jpg|Resler Module Configurator |
</gallery> | </gallery> | ||
| − | + | The Resler Module allows pre-programming of up to 8 timers with a lead time of up to one week and weekly repetition beyond that.<br /> | |
{| class="wikitable" | {| class="wikitable" | ||
|- | |- | ||
| − | | | + | | Example|| Example |
|- | |- | ||
| − | | ''' | + | | '''activate/ deactivate timer'''|| Set the slider accordingly. After the timer has run, it is deactivated. |
|- | |- | ||
| − | | ''' | + | | '''Start time'''|| Set the start time for the timer |
|- | |- | ||
| − | | ''' | + | | '''Duration'''|| Setting the duration of the timer (1-30 minutes) |
|- | |- | ||
| − | | ''' | + | | '''Days'''|| Set the days on which the timer should be active |
|- | |- | ||
| − | | ''' | + | | '''Weekly repetition'''|| The complete timer is repeated continuously every week as it is set.<br /> |
| − | + | The option also has to be set if the timer shall run on more than one day. Otherwise the timer will be deactivated after the first run. | |
|- | |- | ||
| − | | ''' | + | | '''Functional type'''|| The type can be set to auxiliary heating/ventilation or relay.<br /> |
| − | + | The air-conditioning control unit decides whether ventilation or heating is required based on the outside temperature (16°C is the switchover point). | |
|} | |} | ||
| − | ''' | + | <big>'''NOTE''': Since the air conditioning control unit decides which function is to be implemented the timer can usually always be used for the auxiliary ventilation function (except E46/E83/E85) even if no auxiliary heating is installed.</big><br /> |
<br /> | <br /> | ||
Version vom 21. Juli 2022, 07:52 Uhr
With the Resler Module Configurator (current version: 0.9.29) you may comfortably configure all functions of the Resler Module on your desk at the computer prior to installing the module into the car.
The configurator is particularly convenient to use thanks to its appealing user interface. It is primarily used for settings when the Resler Module is to be used standalone (i.e. without the Android radio/I-BUS app).
- Read / write Resler Module
- Flash Resler Module firmware from a file (available updates are recognised and automatically downloaded from the Internet).
- load and save Resler Module configuration (from/to file)
- Load and save CHLH light sequences from file (also in I-BUS App format to transfer them to the module with the I-BUS App in the car).
- Set vehicle configuration
- Configure CHLH Start and Stop
- Configure auxiliary heating / auxiliary ventilation
- Configure folding/unfolding mirrors
- Configure timer for auxiliary heating / auxiliary ventilation / relay output
- configure comfort blinking / cornering light / daytime running light / highway light
- Conveniently create / edit light sequences
Especially the editing of CHLH light sequences is much more easy with the configurator on the PC than in the car.
The following settings are available in the Resler Module Configurator:
Inhaltsverzeichnis
Load/Save

Resler Module Configurator

Resler Module Configurator

Resler Module Configurator

Resler Module Configurator


Module
With "Read module", the configuration on the module is read out and displayed in the Resler module configurator. It can then be edited.
With "Write module" the configuration set in the Resler Module configurator is written to the Resler Module.
Firmware
With "Flash Firmware File" you can flash a previously downloaded firmware onto the Resler Module.
If the firmware on the module is not up to date an info appears and the button "Flash firmware update" is displayed and can be confirmed.
The progress of the flash process is shown in the bar next to it.
If a module is connected the firmware version of the module will be displayed at the bottom of the field.
Module Configurator
Here you can save the created configuration on the computer or load a configuration saved on the computer to display it in the Resler Module configurator, edit it or write it to the module.
Configurations have the file format *.rmc
I-BUS App
Light sequences can be loaded into the file format of the I-BUS App (*.xml) to be shown or edited under "Light sequences". For this purpose light sequences can be saved again in the file format for the I-BUS App. These can then be transferred to the Android device with a data carrier (USB stick or SD card) and imported in the app in the lighting control under "Load".
Language
Currently the Resler Module Configurator is available in German and English.
Other languages are in the process of being added.
If you are fluent in a language other than German or English - and know all the technical terms used in the app - and want to help Rolf translate the app: [get in touch with Rolf]!
Module Mode
You have to specify whether the module is to be
- in operation with or without I-BUS app
- "Module active" (all functions active)
- "Module only active with ignition off" (only CHLH, mirror flaps and aux heater control works).
- "Module completely inactive"
In particular BMW E46/E83/E85 (i.e. with LSZ) have to REMOVE the hook at "Operation with I-BUS App" in the mode if the module is to be used without I-BUS App. Otherwise, the speedometer will dim when flashing.
Car configuration

Resler Module Configurator

Car series
Select the series of the vehicle in which the Resler module is to be used.
If this is not done malfunctions (such as different active lights) may occur.
On-board computer
Here you have to set whether you have installed the speedometer without on-board computer, with the small display or the large display. This applies to BMW E38/E39/E53. BMW E46 and E83 always have the "High BC".
Habe ich High oder Low BC?
Heating/ventilator
NOTE: If the function is set to auxiliary heating on vehicles WITHOUT auxiliary heating and this is started a malfunctions will occur. Often the fan is started and can only be stopped by disconnecting the vehicle battery. Therefore make sure that a parking heater is installed.
An indication of an installed auxiliary heater may(!) be a sticker of the company "Webasto" in the engine compartment on the left dome. However this is also present if only an additional heater is coded in the case of diesel vehicles.
Initially the type must be defined for this (especially for control via remote control).
| OFF | There is NO control of the parking heater/parking heater ventilation |
| Type 1 | Only for E38/E39/E53 with High BC speedometer |
| Type 2 | E38/E39/E53 with Low BC speedometer |
| Relay | In the E46/E83/E85 the control is done via +12V switching signal instead of via the BUS system. By retrofitting a relay (not included) this can be switched via the ground signal on the green wire of the Resler module. |
Mirrors
- 'Fold/Unfold Mirrors: Sets the start conditions for the folding/unfolding of the mirrors. The following options are available:
- OFF
- Double-tapping the remote control
- Always active
- 'Invert mirror unfolding: If the mirrors fold in when unlocking, the function can be reversed here
- Unfolding the mirrors when the ignition is switched on: Unfolding of the (folded) mirrors only happens when ignition level 2 is switched on.
Coming/Leaving Home
Settings for Coming/Leaving Home

Here you find the following functions:
| Coming Home [CH] | ("Home lights" - Lights up e.g. when locking the car) |
| Leaving Home [LH] | ("Welcome lights" - Lights up e.g. when unlocking the car) |
We shorten both functions with "CHLH".
Starting time for CHLH
CHLH may be always on oder always off .
or
set start and end manually. Only if so underneath following items are shown:
| Coming Home end time | Time of day until CHLH is active1 |
| Coming Home start time | Time of day from which on CHLH is active1 |
or
Automatically calculate the start/end time based on location, date and twilight type:
| Daytime calculation mode2 | Sets the start/end time depending on the GPS position, date and twilight process (sunrise/sunset) when turn ignition off |
| CHLH start time delay | Sets time difference "xx" before sunset/time of day calculation when CHLH should start (Window: -120 ... +120 minutes, negative time moves the time forward, positive moves it backwards). |
| CHLH end time delay | Sets time difference "yy" after sunset/time of day calculation when CHLH should end (Window: -120 ... +120 minutes, negative time moves the time forward, positive moves it backwards). |
1unless "always active" or a "time of day calculation mode" is set
2 Calculation options see table, calculated time incl. displacement is displayed in the status
| Computation model | Explanation |
|---|---|
| No calculation of the day times | Use of fixed times, always active or always off |
| Sunrise/sunset | Calculated sunrise and sunset |
| Civil twilight | Darkness beyond which it is no longer possible to work or read outside without artificial light. |
| Nautical twilight | Follow the civil twilight to the darkness beyond which you cannot yet see the stars. |
| Astronomical twilight | From this level of darkness, stars are visible in the sky |

twilight calculation

comparison of twilight types


Additional start/stop signals for CHLH
In addition the following start/stop signals for CHLH can be defined:
| CHLH Start/stop by ignition | Coming Home sequence begins with ignition off. Leaving Home sequence ends with ignition on (if it is still running). |
| Coming Home start when opening a door | Coming Home sequence already starts with opening a door after switching off the ignition |
| Leaving Home stop when opening a door | Stop the Leaving Home sequence with opening a door, if it is still running. |
| Activate CHLH in underground car park | If this option is activated, CHLH is activated if the GPS signal is lost (takes about 60 seconds), e.g. in an underground car park. This means that the lights also start outside the set time if the GPS signal is missing. |
These functions are partly locked against each other so that they are mutually exclusive.

start signal CHLH

Light sequences for Coming Home/Leaving Home
The Resler Module has a microcontroller and a clock module so that it is possible to create light sequences for CHLH as desired.
A total of up to 100 sequences are possible, which can be divided between CH and LH as desired.
Setting the light sequence is done as already known via the menu light control

Light selection

Load light sequence

import light sequence

save light sequence

export light sequence

example for light sequence


Quick guide:
After creating/loading/importing the light sequence:
- Tap on „Save“
- e.g. select memory slot 2 - 6 (memory slot 1 is intended in the app for "2x headlight flasher, not for CHLH).
- Confirm question for use as Coming/Leaving Home
- Select use for Coming OR Leaving Home
- Confirm "Send to Resler Module"
- Wait for successful writing to the Resler module, if an error occurs, restart at 1).
Download and insert sample light sequences for Coming Home/Leaving Home
In Load', there is now also the Import from the Resler module or from the memory of the radio (e.g. with sequences created on the PC or example sequences).
Timer

Resler Module Configurator

The Resler Module allows pre-programming of up to 8 timers with a lead time of up to one week and weekly repetition beyond that.
| Example | Example |
| activate/ deactivate timer | Set the slider accordingly. After the timer has run, it is deactivated. |
| Start time | Set the start time for the timer |
| Duration | Setting the duration of the timer (1-30 minutes) |
| Days | Set the days on which the timer should be active |
| Weekly repetition | The complete timer is repeated continuously every week as it is set. The option also has to be set if the timer shall run on more than one day. Otherwise the timer will be deactivated after the first run. |
| Functional type | The type can be set to auxiliary heating/ventilation or relay. The air-conditioning control unit decides whether ventilation or heating is required based on the outside temperature (16°C is the switchover point). |
NOTE: Since the air conditioning control unit decides which function is to be implemented the timer can usually always be used for the auxiliary ventilation function (except E46/E83/E85) even if no auxiliary heating is installed.
Lichtfunktionen

Resler Modul Konfigurator

Sofern das Modul OHNE Android-Radio und I-BUS App genutzt wird, sind die Einstellungen die hier gesetzt werden in jedem Fall aktiv.
Wird das Resler Modul mit der I-BUS App genutzt, so kann in der I-BUS App umgeschaltet werden, ob die Licht-Funktionen vom Resler Modul oder der App umgesetzt werden sollen.
Vorteil der Steuerung via Resler Modul ist vor allem, dass es unabhängig von App und Radio funktioniert. Das heißt auch bei ausgeschaltetem Radio oder geschlossener I-BUS App sind die Funktionen verfügbar.
Zum "Abschalten" des Tagfahrlichts einfach alle Leuchten abwählen.
Licht Sequenzen

Resler Modul Konfigurator

Hier können Lichtsequenzen erstellt und editiert werden.
Wichtig ist, dass festgelegt werden muss, ob die Sequenz für Coming Home oder Leaving Home genutzt werden soll. Zum Umschalten auf den jeweiligen Radio-Button tippen.
Lichter können durch Klick am Fahrzeug auf die jeweilige Leuchte gewählt oder abgewählt werden. Optional können oben im Text die Checkboxen gesetzt werden.
Mit dem "Plus" mit Pfeil links oder rechts kann eine neue Sequenz vor oder nach der gewählten Sequenz eingefügt werden. Mit dem "x" wird die gewählte Sequenz gelöscht.
Die Dauer der einzelnen Sequenzen kann für jede gewählte Sequenz über den Schieberegler oder das Eingabefeld definiert werden.
Zusätzlich funktionieren die bekannten Tastenkombinationen "STRG+C", "STRG+X" und "STRG+V".
Sind die Lichtsequenzen fertig, so können Sie im Reiter "Laden/Speichern" via "Modul schreiben" auf das Modul geschrieben werden.
Download
Download des Resler Modul Konfigurators
Quelle: www.reslers.de
Windows-Treiber für das Resler Modul
Download Treiber (zip)
Download Treiber Setup
Beispiel-Lichtsequenzen zum Download
Download Beispiel-Lichtsequenzen (inkl. Beispielvideos)