Resler Module Settings: Unterschied zwischen den Versionen
André (Diskussion | Beiträge) K (→Download und Einfügen von Beispiel-Lichtsequenzen für Coming Home/Leaving Home) |
André (Diskussion | Beiträge) K (→Download and insert sample light sequences for Coming Home/Leaving Home) |
||
| (14 dazwischenliegende Versionen desselben Benutzers werden nicht angezeigt) | |||
| Zeile 6: | Zeile 6: | ||
All '''[[Resler Module]]''' settings occur when a '''[[Resler Module]]''' was plugged and I-BUS app have been reactivated.<br /> | All '''[[Resler Module]]''' settings occur when a '''[[Resler Module]]''' was plugged and I-BUS app have been reactivated.<br /> | ||
They are located at the second position in the I-BUS App settings and are subdivided into the topics: | They are located at the second position in the I-BUS App settings and are subdivided into the topics: | ||
| − | * [https://wiki.ibus-app.de/index.php?title=Resler_Module_Settings | + | * [https://wiki.ibus-app.de/index.php?title=Resler_Module_Settings#Mirror_control Mirror control] |
| − | * [https://wiki.ibus-app.de/index.php?title= | + | * [https://wiki.ibus-app.de/index.php?title=Resler_Module_Settings#Coming.2FLeaving_Home Coming/Leaving Home] |
| − | * [https://wiki.ibus-app.de/index.php?title= | + | * [https://wiki.ibus-app.de/index.php?title=Resler_Module_Settings#Light_control Light control] |
| − | * [https://wiki.ibus-app.de/index.php?title= | + | * [https://wiki.ibus-app.de/index.php?title=Resler_Module_Settings#Auxiliary_heating.2Fventilation Auxiliary heating/ventilation] |
| − | * [https://wiki.ibus-app.de/index.php?title= | + | * [https://wiki.ibus-app.de/index.php?title=Resler_Module_Settings#Old_GM-Modul Old GM-Modul] |
| − | * [https://wiki.ibus-app.de/index.php?title= | + | * [https://wiki.ibus-app.de/index.php?title=Resler_Module_Settings#Resler_Module_status Resler Modul Status] |
<br /> | <br /> | ||
<br /> | <br /> | ||
| Zeile 126: | Zeile 126: | ||
=== Download and insert sample light sequences for Coming Home/Leaving Home === | === Download and insert sample light sequences for Coming Home/Leaving Home === | ||
| − | + | Download '''[https://download.ibus-app.de/Lightshow/I-BUS_App_%20Lightshows.zip example sequences]''', unzip files and copy them to the head unit.<br /> | |
| + | Open "light control" in I-BUS app and tap on "Load" and select "import".<br /> | ||
| + | Navigate to the folder where you've copied the sequences to and select one file.<br /> | ||
| + | Sequence was loaded and shown in light control.<br /> | ||
| + | Now you may e.g. save it to "memory 2", select it as CH/LH and save it to the Resler module. | ||
| + | <br /> | ||
| + | <br /> | ||
| + | |||
| + | === Import from Resler module === | ||
| + | In '''Load'''' there is now also the '''Import''' from the Resler module. | ||
<br /> | <br /> | ||
<br /> | <br /> | ||
---- | ---- | ||
| − | == | + | == Light control == |
<gallery mode="packed-hover"> | <gallery mode="packed-hover"> | ||
| − | RM Einstellungen lights 01.jpg| | + | RM Einstellungen lights 01.jpg|Light control menu - Light control via Resler Modul active |
| − | RM Einstellungen lights 01a.jpg| | + | RM Einstellungen lights 01a.jpg|Light control menu - Light control via I-BUS app active |
| − | RM Einstellungen lights 02.jpg| | + | RM Einstellungen lights 02.jpg|settings light control |
| − | RM Einstellungen lights 03.jpg| | + | RM Einstellungen lights 03.jpg|settings light control |
| − | RM Einstellungen lights 04.jpg| | + | RM Einstellungen lights 04.jpg|settings light control |
| − | RM Einstellungen lights 05.jpg| | + | RM Einstellungen lights 05.jpg|settings light control |
| − | RM Einstellungen lights 06.jpg| | + | RM Einstellungen lights 06.jpg|settings light control |
</gallery> | </gallery> | ||
| − | In | + | In the light control it is generally possible to switch whether the functions are to be performed by the Resler module or I-BUS app.<br /> |
| − | + | The advantage of control via the Resler module is that it works independently of the I-BUS App and radio. This means that the functions are available even when the radio is switched off or the I-BUS app is closed.<br /> | |
| − | + | Otherwise these functions correspond to those of the app.<br /> | |
| − | + | To "switch off" the daytime running lights simply deselect all lights. | |
<br /><br /> | <br /><br /> | ||
---- | ---- | ||
| − | == | + | == Auxiliary heating/ventilation == |
| − | <font color="red"><big>''' | + | <font color="red"><big>'''NOTE: If the function is set to auxiliary heating on vehicles WITHOUT auxiliary heating and this is started, malfunctions will occur. Often the fan is started and cannot be stopped unless the vehicle battery is disconnected. Therefore make sure that a auxiliary heating is installed.'''</big> </font> <br /> |
| − | <font color="red"><big> | + | <font color="red"><big>An indication of an installed auxiliary heater can(!) be a sticker of the manufacturer "Webasto" in the engine compartment on the left dome. However this is also present if only one auxiliary heater is coded on diesel vehicles.</big> </font> |
<gallery mode="packed-hover"> | <gallery mode="packed-hover"> | ||
| − | RM STH 00.jpg| | + | RM STH 00.jpg|settings auxiliary heating/ventilation |
| − | RM STH 01.jpg| | + | RM STH 01.jpg|types of auxiliary heating/ventilation |
</gallery> | </gallery> | ||
| − | + | The Resler module can perform the control of the auxiliary heating/ventilation.<br /> | |
| − | + | Initially the type must be defined (especially for control via remote control). | |
{| class="wikitable" | {| class="wikitable" | ||
|- | |- | ||
| − | | ''' | + | | '''OFF'''|| There is NO control of the auxiliary heating/ventilation. |
|- | |- | ||
| − | | ''' | + | | '''type 1'''|| Only for E38/E39/E53 with high BC speeedometer |
|- | |- | ||
| − | | ''' | + | | '''type 2'''|| E38/E39/E53 with Low BC speeedometer |
|- | |- | ||
| − | | ''' | + | | '''relay'''|| In the E46/E83/E85 the auxiliary heating is controlled via +12V switching signal instead of via the BUS system.<br /> |
| − | + | With '''retrofitting a relay''' (not included) a relay may be switched via ground signal on the green wire from the Resler module.<br /> | |
| − | ''' | + | '''IMPORTANT! A 12V relay with more than 250 Ohm excitation winding and recovery diode is required! Otherwise the Resler Module may be destroyed.''' |
|} | |} | ||
| − | + | To decide which type to set, please check: [[Habe ich High oder Low BC?]]<br /> | |
<br /> | <br /> | ||
| − | === | + | === Direct start of the auxiliary heating/ventilation via remote control === |
| − | + | The remote control in the vehicle key can be used to start/stop the auxiliary heating/ventilation directly.<br /> | |
| − | + | Use the slider to determine whether the auxiliary heating or auxiliary ventilation is to be used.<br /> | |
{| class="wikitable" | {| class="wikitable" | ||
|- | |- | ||
| − | | ''' | + | | '''Starting auxiliary heating/ventilation'''|| The vehicle has to be locked. Press and hold the close button on the key for approximately 2 seconds. The start is confirmed visually by '''2x "slow flashing"'''. |
|- | |- | ||
| − | | ''' | + | | '''Stop auxiliary heating/ventilation'''|| The vehicle has to be locked and the auxiliary heating/ventilation has to be running. Press and hold the close button on the key for approx. 2 seconds. The stop is confirmed visually by '''3x "slow flashing"'''. Note: The auxiliary heating cools down with the combustion air fan for approx. 180s so that it does not stop immediately. |
|} | |} | ||
<br /><br /> | <br /><br /> | ||
| − | === Timer | + | === Timer control for auxiliary heating/ventilation === |
| − | + | The Resler Module allows pre-programming of up to 8 timers with a lead time of up to one week and weekly repetition beyond that.<br /> | |
{| class="wikitable" | {| class="wikitable" | ||
|- | |- | ||
| − | | | + | | Example|| Example |
|- | |- | ||
| − | | ''' | + | | '''activate/ deactivate timer'''|| Set the slider accordingly. After the timer has run, it is deactivated. |
|- | |- | ||
| − | | ''' | + | | '''Start time'''|| Set the start time for the timer |
|- | |- | ||
| − | | ''' | + | | '''Duration'''|| Setting the duration of the timer (1-30 minutes) |
|- | |- | ||
| − | | ''' | + | | '''Days'''|| Set the days on which the timer should be active |
|- | |- | ||
| − | | ''' | + | | '''Weekly repetition'''|| The complete timer is repeated continuously every week as it is set.<br /> |
| − | + | The option also has to be set if the timer shall run on more than one day. Otherwise the timer will be deactivated after the first run. | |
|- | |- | ||
| − | | ''' | + | | '''Functional type'''|| The type can be set to auxiliary heating/ventilation or relay.<br /> |
| − | + | The air-conditioning control unit decides whether ventilation or heating is required based on the outside temperature (16°C is the switchover point). | |
|} | |} | ||
| − | ''' | + | <big>'''NOTE''': Since the air conditioning control unit decides which function is to be implemented the timer can usually always be used for the auxiliary ventilation function (except E46/E83/E85) even if no auxiliary heating is installed.</big> |
<gallery mode="packed-hover"> | <gallery mode="packed-hover"> | ||
| − | RM STH 02.jpg| | + | RM STH 02.jpg|Auxiliary heating/ventilation - timer overview |
| − | RM STH 03.jpg| | + | RM STH 03.jpg|Auxiliary heating/ventilation - timer settings |
</gallery> | </gallery> | ||
<br /><br /> | <br /><br /> | ||
---- | ---- | ||
| − | == | + | == Change model series == |
<gallery mode="packed-hover"> | <gallery mode="packed-hover"> | ||
| − | RM Einstellungen Baureihe.jpg| | + | RM Einstellungen Baureihe.jpg|Change model series |
</gallery><br /> | </gallery><br /> | ||
| − | ''' | + | '''In addition''' to the correctly set '''vehicle series''' in the '''general settings of the I-BUS app''', please check whether the vehicle series in the '''Resler module settings''' matches the vehicle type!<br /> |
| − | + | This is essential for correct functioning.<br /> | |
| − | <font color="red"><big>''' | + | <font color="red"><big>'''If the wrong model series is selected malfunctions may occur!'''</big></font> |
<br /><br /> | <br /><br /> | ||
---- | ---- | ||
| − | == | + | == Old Body Module (GM) == |
<gallery mode="packed-hover"> | <gallery mode="packed-hover"> | ||
| − | RM Einstellungen 01.jpg| | + | RM Einstellungen 01.jpg|Old Body Module |
</gallery><br /> | </gallery><br /> | ||
| − | + | A few older E38 and E39 (probably before 1995) have an "old body module" (GM) in the vehicle. If the vehicle used was manufactured in this period AND no functions work via radio remote control (normal locking/unlocking must work independently of the Resler module!), this option can be activated to be able to use the "CHLH via remote control" and "mirror folding via remote control".<br /> | |
| − | + | The functions for pressing the remote control twice or for a long time (e.g. starting the auxiliary heating/ventilation via remote) have not yet been used. Mirrors are always folded/unfolded. | |
<br /><br /> | <br /><br /> | ||
---- | ---- | ||
| − | == Modul | + | |
| + | == Modul Modes == | ||
<gallery mode="packed-hover"> | <gallery mode="packed-hover"> | ||
| − | RM Einstellungen 03.jpg|Modul | + | RM Einstellungen 03.jpg|Modul Modes |
</gallery><br /> | </gallery><br /> | ||
| − | + | In module mode, it is possible to choose whether: | |
| − | * | + | * all functions are active |
| − | * | + | * all functions of the module are deactivated when the ignition is switched on (so remain: Coming/Leaving Home and fold/unfold mirror) |
| − | * | + | * all functions of the module are DISABLED (so it only acts as "interface") |
<br /><br /> | <br /><br /> | ||
---- | ---- | ||
| − | == Resler | + | |
| + | == Resler Module status== | ||
<gallery mode="packed-hover"> | <gallery mode="packed-hover"> | ||
| − | RM Status 00.jpg|Resler | + | RM Status 00.jpg|Resler Module status |
| − | RM Status 02.jpg|Resler | + | RM Status 02.jpg|Resler Module status - CHLH sequences |
| − | RM Status 03.jpg|Resler | + | RM Status 03.jpg|Resler Module status - Car Info |
</gallery> | </gallery> | ||
| − | + | In „Resler Module status“ you will find important infos as | |
| − | * | + | * The time in the Resler Module and the radio (Android system time) |
| − | * | + | * The serial number of the Resler Module (will be registered) |
| − | * | + | * The firmware version of the Resler Module |
| − | * I-BUS | + | * I-BUS status: shows whether all connections on the module are OK or whether something is missing (BUS signal, 12V, ground). |
| − | * | + | * Some counters that may be relevant to us<br /> |
<br /> | <br /> | ||
| − | + | At the bottom there are a few buttons with the following functions: | |
{| class="wikitable" | {| class="wikitable" | ||
|- | |- | ||
| − | ! Button!! | + | ! Button!! Short tap function!! Long tap function |
|- | |- | ||
| − | | '''Status'''|| | + | | '''Status'''|| Reloads the status information|| Reset the status and counters |
|- | |- | ||
| − | | '''CH/LH'''|| | + | | '''CH/LH'''|| Shows the start and end time for CH/LH|| Shows the light sequences for CH/LH (only as short code) |
|- | |- | ||
| − | | '''CH/LH | + | | '''CH/LH ON/OFF'''|| Switch CH/LH always on or off|| Manually set start/end times for CH/LH |
|- | |- | ||
| − | | ''' | + | | '''TIME SETTING'''|| Sets the Android system time to the Resler Module|| - |
|- | |- | ||
| − | | '''EEPROM | + | | '''ERASE EEPROM'''|| Erases the memory on the Resler Module|| - |
|- | |- | ||
| − | | ''' | + | | '''FLASH'''|| Opens the menu for flashing the Resler module (installing new firmware).|| Resets Resler Module |
|} | |} | ||
<br /><br /> | <br /><br /> | ||
| − | === I-BUS | + | === I-BUS status === |
| − | ''' | + | '''The correct connection of the Resler module can be checked via the I-BUS status.'''<br /> |
| − | + | The following information is available. | |
{| class="wikitable" | {| class="wikitable" | ||
|- | |- | ||
| − | ! Status!! | + | ! Status!! Meaning!! Action |
|- | |- | ||
| − | | '''OK''' || | + | | '''OK''' || Activity detected on the I-BUS. Connection is correct|| - |
|- | |- | ||
| − | | '''No activity on IBUS'''|| | + | | '''No activity on IBUS'''|| White I-BUS line not connected or connected to +12V line|| Check the connection of the white wire |
|- | |- | ||
| − | | '''IBUS Line Permanent grounded'''|| | + | | '''IBUS Line Permanent grounded'''|| White I-BUS line connected to ground|| Check the connection of the white wire |
|- | |- | ||
| − | | '''No +12V Power'''|| +12 V | + | | '''No +12V Power'''|| +12 V connection missing on the red cable|| Check and ensure that the red wire is connected to continuous positive (and the brown wire to earth). |
|} | |} | ||
| − | + | For more information on connection see: '''[[Einbauanleitung für Resler Modul und Resler Interface]]''' | |
<br /><br /> | <br /><br /> | ||
| − | === Resler | + | === Manually flashing the Resler Module === |
| − | + | Usually when the app is started it checks whether a new app version and/or firmware is available for the module<sup>3</sup>. If something is available the update is offered and can be executed directly.<br /> | |
<br /> | <br /> | ||
Sollte ein manuelles Flashen notwendig sein: | Sollte ein manuelles Flashen notwendig sein: | ||
| − | # Resler | + | # Open Resler Module Settings |
| − | # Resler | + | # Open Resler Module Status |
| − | # | + | # Tap the "Flash" button |
| − | # | + | # The selection of available data media opens. Select the data carrier on which the flash file<sup>4</sup> is located and navigate through the folder structure to the storage location where the file is located. |
| − | # | + | # Tapping the desired file starts the flash process. |
| − | # | + | # Wait for the flash to complete and then exit the flash menu.<br /> |
<br /> | <br /> | ||
| − | + | Optionally the Resler Module can also be flashed on the PC with the [[Resler Module Configurator]].<br /><br /> | |
| − | + | In addition to manual flashing, there is of course also the option of manual flashing according to our [https://download.ibus-app.de/Firmware/ released firmware updates] in the same way as it works with the app. The button for manually checking whether updates are available is in the left menu: "Firmware Update". | |
<gallery mode="packed-hover"> | <gallery mode="packed-hover"> | ||
| − | RM Status 00.jpg|Resler Modul Status - " | + | RM Status 00.jpg|Resler Modul Status - "Flash" button |
RM Einstellungen 02.jpg|Resler Modul Firmware Update | RM Einstellungen 02.jpg|Resler Modul Firmware Update | ||
RM Status 04.jpg|Resler Modul Firmware Update | RM Status 04.jpg|Resler Modul Firmware Update | ||
| − | RM Status 05.jpg| | + | RM Status 05.jpg|Selection Firmware |
</gallery> | </gallery> | ||
| − | <sup>3</sup> | + | <sup>3</sup> Active internet connection required.<br /> |
| − | <sup>4</sup> [https://download.ibus-app.de/Firmware/ | + | <sup>4</sup> [https://download.ibus-app.de/Firmware/ released firmware updates]<br /> |
<br /> | <br /> | ||
| − | == | + | == Topic: Consumer shutdown == |
<br /> | <br /> | ||
| − | <big>''' | + | <big>'''With the new Resler Module there is no need to change radio wiring to [[Radio_auf_Verbraucherabschaltung_umklemmen|consumer shutdown]].'''</big><br /> |
| − | <big>''' | + | <big>'''Therefore it is strongly recommended to reconnect the radio "normally" to terminal 15/ignition if it's connected to consumer shotdown right now.'''</big><br /><br /> |
<br /> | <br /> | ||
| − | == | + | |
| − | <big><big>'''[[Resler | + | == General information about the Resler Module == |
| + | <big><big>'''[[Resler Module]]'''</big></big><br /> | ||
<br /> | <br /> | ||
<br /> | <br /> | ||
Aktuelle Version vom 17. Januar 2024, 08:22 Uhr
Inhaltsverzeichnis

Resler Modul settings

Resler Modul menu options


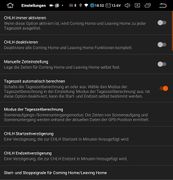
All Resler Module settings occur when a Resler Module was plugged and I-BUS app have been reactivated.
They are located at the second position in the I-BUS App settings and are subdivided into the topics:
- Mirror control
- Coming/Leaving Home
- Light control
- Auxiliary heating/ventilation
- Old GM-Modul
- Resler Modul Status
General note: The module is only able to implement functions for installed and intact features of the car. (e.g. folding mirrors up/down only works if the mirrors have this function and it is intact - usually this function is also available without the module via other controls).
Mirror control

settings for mirror control

Start signal folding/unfolding


- Mirror folding/unfolding: Sets the start conditions for the folding/unfolding of the mirrors. The following options are available:
- Off
- Double-tapping the remote control
- always active
- invert unfold mirror: If the mirrors fold in when unlocking, the function can be inverted here
- Unfolding the mirrors when the ignition is turned on: Unfolding of the (folded) mirrors only happens when the ignition level 2 is engaged.
Coming/Leaving Home
Settings for Coming/Leaving Home

Here you find the following functions:
| Coming Home [CH] | ("Home lights" - Lights up e.g. when locking the car) |
| Leaving Home [LH] | ("Welcome lights" - Lights up e.g. when unlocking the car) |
We shorten both functions with "CHLH".
Starting time for CHLH
CHLH may be always on oder always off .
or
set start and end manually. Only if so underneath following items are shown:
| Coming Home end time | Time of day until CHLH is active1 |
| Coming Home start time | Time of day from which on CHLH is active1 |
or
Automatically calculate the start/end time based on location, date and twilight type:
| Daytime calculation mode2 | Sets the start/end time depending on the GPS position, date and twilight process (sunrise/sunset) when turn ignition off |
| CHLH start time delay | Sets time difference "xx" before sunset/time of day calculation when CHLH should start (Window: -120 ... +120 minutes, negative time moves the time forward, positive moves it backwards). |
| CHLH end time delay | Sets time difference "yy" after sunset/time of day calculation when CHLH should end (Window: -120 ... +120 minutes, negative time moves the time forward, positive moves it backwards). |
1unless "always active" or a "time of day calculation mode" is set
2 Calculation options see table, calculated time incl. displacement is displayed in the status
| Computation model | Explanation |
|---|---|
| No calculation of the day times | Use of fixed times, always active or always off |
| Sunrise/sunset | Calculated sunrise and sunset |
| Civil twilight | Darkness beyond which it is no longer possible to work or read outside without artificial light. |
| Nautical twilight | Follow the civil twilight to the darkness beyond which you cannot yet see the stars. |
| Astronomical twilight | From this level of darkness, stars are visible in the sky |

twilight calculation

comparison of twilight types


Additional start/stop signals for CHLH
In addition the following start/stop signals for CHLH can be defined:
| CHLH Start/stop by ignition | Coming Home sequence begins with ignition off. Leaving Home sequence ends with ignition on (if it is still running). |
| Coming Home start when opening a door | Coming Home sequence already starts with opening a door after switching off the ignition |
| Leaving Home stop when opening a door | Stop the Leaving Home sequence with opening a door, if it is still running. |
| Activate CHLH in underground car park | If this option is activated, CHLH is activated if the GPS signal is lost (takes about 60 seconds), e.g. in an underground car park. This means that the lights also start outside the set time if the GPS signal is missing. |
These functions are partly locked against each other so that they are mutually exclusive.

start signal CHLH

Light sequences for Coming Home/Leaving Home
The Resler Module has a microcontroller and a clock module so that it is possible to create light sequences for CHLH as desired.
A total of up to 100 sequences are possible, which can be divided between CH and LH as desired.
Setting the light sequence is done as already known via the menu light control

Light selection

Load light sequence

import light sequence

save light sequence

export light sequence

example for light sequence


Quick guide:
After creating/loading/importing the light sequence:
- Tap on „Save“
- e.g. select memory slot 2 - 6 (memory slot 1 is intended in the app for "2x headlight flasher, not for CHLH).
- Confirm question for use as Coming/Leaving Home
- Select use for Coming OR Leaving Home
- Confirm "Send to Resler Module"
- Wait for successful writing to the Resler module, if an error occurs, restart at 1).
Download and insert sample light sequences for Coming Home/Leaving Home
Download example sequences, unzip files and copy them to the head unit.
Open "light control" in I-BUS app and tap on "Load" and select "import".
Navigate to the folder where you've copied the sequences to and select one file.
Sequence was loaded and shown in light control.
Now you may e.g. save it to "memory 2", select it as CH/LH and save it to the Resler module.
Import from Resler module
In Load' there is now also the Import from the Resler module.
Light control

Light control menu - Light control via Resler Modul active

Light control menu - Light control via I-BUS app active

settings light control

settings light control

settings light control

settings light control

settings light control


In the light control it is generally possible to switch whether the functions are to be performed by the Resler module or I-BUS app.
The advantage of control via the Resler module is that it works independently of the I-BUS App and radio. This means that the functions are available even when the radio is switched off or the I-BUS app is closed.
Otherwise these functions correspond to those of the app.
To "switch off" the daytime running lights simply deselect all lights.
Auxiliary heating/ventilation
NOTE: If the function is set to auxiliary heating on vehicles WITHOUT auxiliary heating and this is started, malfunctions will occur. Often the fan is started and cannot be stopped unless the vehicle battery is disconnected. Therefore make sure that a auxiliary heating is installed.
An indication of an installed auxiliary heater can(!) be a sticker of the manufacturer "Webasto" in the engine compartment on the left dome. However this is also present if only one auxiliary heater is coded on diesel vehicles.

settings auxiliary heating/ventilation
types of auxiliary heating/ventilation


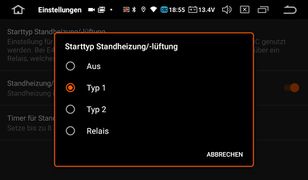
The Resler module can perform the control of the auxiliary heating/ventilation.
Initially the type must be defined (especially for control via remote control).
| OFF | There is NO control of the auxiliary heating/ventilation. |
| type 1 | Only for E38/E39/E53 with high BC speeedometer |
| type 2 | E38/E39/E53 with Low BC speeedometer |
| relay | In the E46/E83/E85 the auxiliary heating is controlled via +12V switching signal instead of via the BUS system. With retrofitting a relay (not included) a relay may be switched via ground signal on the green wire from the Resler module. |
To decide which type to set, please check: Habe ich High oder Low BC?
Direct start of the auxiliary heating/ventilation via remote control
The remote control in the vehicle key can be used to start/stop the auxiliary heating/ventilation directly.
Use the slider to determine whether the auxiliary heating or auxiliary ventilation is to be used.
| Starting auxiliary heating/ventilation | The vehicle has to be locked. Press and hold the close button on the key for approximately 2 seconds. The start is confirmed visually by 2x "slow flashing". |
| Stop auxiliary heating/ventilation | The vehicle has to be locked and the auxiliary heating/ventilation has to be running. Press and hold the close button on the key for approx. 2 seconds. The stop is confirmed visually by 3x "slow flashing". Note: The auxiliary heating cools down with the combustion air fan for approx. 180s so that it does not stop immediately. |
Timer control for auxiliary heating/ventilation
The Resler Module allows pre-programming of up to 8 timers with a lead time of up to one week and weekly repetition beyond that.
| Example | Example |
| activate/ deactivate timer | Set the slider accordingly. After the timer has run, it is deactivated. |
| Start time | Set the start time for the timer |
| Duration | Setting the duration of the timer (1-30 minutes) |
| Days | Set the days on which the timer should be active |
| Weekly repetition | The complete timer is repeated continuously every week as it is set. The option also has to be set if the timer shall run on more than one day. Otherwise the timer will be deactivated after the first run. |
| Functional type | The type can be set to auxiliary heating/ventilation or relay. The air-conditioning control unit decides whether ventilation or heating is required based on the outside temperature (16°C is the switchover point). |
NOTE: Since the air conditioning control unit decides which function is to be implemented the timer can usually always be used for the auxiliary ventilation function (except E46/E83/E85) even if no auxiliary heating is installed.

Auxiliary heating/ventilation - timer overview

Auxiliary heating/ventilation - timer settings


Change model series

Change model series

In addition to the correctly set vehicle series in the general settings of the I-BUS app, please check whether the vehicle series in the Resler module settings matches the vehicle type!
This is essential for correct functioning.
If the wrong model series is selected malfunctions may occur!
Old Body Module (GM)
Old Body Module
A few older E38 and E39 (probably before 1995) have an "old body module" (GM) in the vehicle. If the vehicle used was manufactured in this period AND no functions work via radio remote control (normal locking/unlocking must work independently of the Resler module!), this option can be activated to be able to use the "CHLH via remote control" and "mirror folding via remote control".
The functions for pressing the remote control twice or for a long time (e.g. starting the auxiliary heating/ventilation via remote) have not yet been used. Mirrors are always folded/unfolded.
Modul Modes

Modul Modes

In module mode, it is possible to choose whether:
- all functions are active
- all functions of the module are deactivated when the ignition is switched on (so remain: Coming/Leaving Home and fold/unfold mirror)
- all functions of the module are DISABLED (so it only acts as "interface")
Resler Module status

Resler Module status

Resler Module status - CHLH sequences

Resler Module status - Car Info


In „Resler Module status“ you will find important infos as
- The time in the Resler Module and the radio (Android system time)
- The serial number of the Resler Module (will be registered)
- The firmware version of the Resler Module
- I-BUS status: shows whether all connections on the module are OK or whether something is missing (BUS signal, 12V, ground).
- Some counters that may be relevant to us
At the bottom there are a few buttons with the following functions:
| Button | Short tap function | Long tap function |
|---|---|---|
| Status | Reloads the status information | Reset the status and counters |
| CH/LH | Shows the start and end time for CH/LH | Shows the light sequences for CH/LH (only as short code) |
| CH/LH ON/OFF | Switch CH/LH always on or off | Manually set start/end times for CH/LH |
| TIME SETTING | Sets the Android system time to the Resler Module | - |
| ERASE EEPROM | Erases the memory on the Resler Module | - |
| FLASH | Opens the menu for flashing the Resler module (installing new firmware). | Resets Resler Module |
I-BUS status
The correct connection of the Resler module can be checked via the I-BUS status.
The following information is available.
| Status | Meaning | Action |
|---|---|---|
| OK | Activity detected on the I-BUS. Connection is correct | - |
| No activity on IBUS | White I-BUS line not connected or connected to +12V line | Check the connection of the white wire |
| IBUS Line Permanent grounded | White I-BUS line connected to ground | Check the connection of the white wire |
| No +12V Power | +12 V connection missing on the red cable | Check and ensure that the red wire is connected to continuous positive (and the brown wire to earth). |
For more information on connection see: Einbauanleitung für Resler Modul und Resler Interface
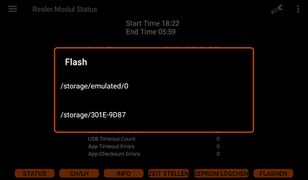
Manually flashing the Resler Module
Usually when the app is started it checks whether a new app version and/or firmware is available for the module3. If something is available the update is offered and can be executed directly.
Sollte ein manuelles Flashen notwendig sein:
- Open Resler Module Settings
- Open Resler Module Status
- Tap the "Flash" button
- The selection of available data media opens. Select the data carrier on which the flash file4 is located and navigate through the folder structure to the storage location where the file is located.
- Tapping the desired file starts the flash process.
- Wait for the flash to complete and then exit the flash menu.
Optionally the Resler Module can also be flashed on the PC with the Resler Module Configurator.
In addition to manual flashing, there is of course also the option of manual flashing according to our released firmware updates in the same way as it works with the app. The button for manually checking whether updates are available is in the left menu: "Firmware Update".
Resler Modul Status - "Flash" button

Resler Modul Firmware Update
Resler Modul Firmware Update

Selection Firmware


3 Active internet connection required.
4 released firmware updates
Topic: Consumer shutdown
With the new Resler Module there is no need to change radio wiring to consumer shutdown.
Therefore it is strongly recommended to reconnect the radio "normally" to terminal 15/ignition if it's connected to consumer shotdown right now.