App settings: Unterschied zwischen den Versionen
André (Diskussion | Beiträge) K (→Zugriffsrecht Resler-Interface) |
André (Diskussion | Beiträge) K (→DSP operating modes) |
||
| (34 dazwischenliegende Versionen desselben Benutzers werden nicht angezeigt) | |||
| Zeile 1: | Zeile 1: | ||
| − | |||
| − | |||
<sub>'''up on app version:''' 2.2.1.4</sub><br /><br /> | <sub>'''up on app version:''' 2.2.1.4</sub><br /><br /> | ||
| Zeile 165: | Zeile 163: | ||
<br /><br /><br /> | <br /><br /><br /> | ||
| − | == | + | == app info / wiki link etc == |
<gallery mode="packed-hover"> | <gallery mode="packed-hover"> | ||
Datei:00 IBUS-App About.png|app info | Datei:00 IBUS-App About.png|app info | ||
| Zeile 199: | Zeile 197: | ||
<br /><br /><br /> | <br /><br /><br /> | ||
| − | == | + | == activating the I-BUS App licence == |
<br /> | <br /> | ||
<gallery mode="packed-hover"> | <gallery mode="packed-hover"> | ||
| − | 0_IBUS-App_Start_Aktivieren.png| | + | 0_IBUS-App_Start_Aktivieren.png|activate (top right or in the pull menu on the left) |
| − | 0_IBUS-App_Start_Aktivieren0.jpg| | + | 0_IBUS-App_Start_Aktivieren0.jpg|vehicle not yet unlocked |
| − | 0_IBUS-App_Start_Aktivieren1.png| | + | 0_IBUS-App_Start_Aktivieren1.png|vehicle unlocked |
</gallery><br /> | </gallery><br /> | ||
| − | + | To '''activate the I-Bus app''', a [https://shop.ibus-app.com/ app licence must have been purchased] and the VIN must be activated (stored online). <br /> | |
| − | + | In addition, a stable connection to the Resler module/Resler interface and the Internet must be guaranteed.<br /> | |
| − | + | To get to the activation screen: | |
| − | * | + | * either click on the three dots in the app toolbar, or |
| − | * | + | * open the menu on the left by tapping on the left three lines Open and scroll down and click on "'''Activate'''". <br /> |
| − | + | once on the screen, the message appears with the current status "''Vehicle not yet unlocked''".<br /> | |
| − | + | click on the '''Activate''' button to start the VIN online check.<br /> | |
| − | + | if the [[Resler Module|Resler module]] is also used, its serial number is also checked and the Resler module is activated.<br /><br /> | |
| − | <big>''' | + | <big>'''a message then appears. there are now five options:'''</big><br /><br /> |
| − | * 1. '''" | + | * 1. ''''"The app has no access to the interface. Please check the USB connection in general app settings. .."''' → Please check whether the USB connection in the "[https://wiki.ibus-app.de/index.php?title=App_Einstellungen_v2#Allgemeine_App-Einstellungen general settings]" in I-BUS app was active. |
| − | * 2. '''" | + | * 2. ''''"The vehicle identification number of your vehicle could not be read. Please check the connection of the individual contacts of the interface. .."''' → Check the connection of the individual contacts of the interface! → [[Einbauanleitung für Resler Modul und Resler Interface]] |
| − | * 3. '''" | + | * 3. '''"No internet connection!"''' → There is no or insufficient Internet connection. |
| − | * 4. '''" | + | * 4. '''"Activation failed!"''' → The VIN is not yet stored online. Buy an app licence and wait a maximum of 24 hours. |
| − | * 5. '''" | + | * 5. '''"Activation successful!"''' → The status changes to "vehicle unlocked". The app functions can now be used to their full extent.<br /><br /> |
<br /><br /><br /> | <br /><br /><br /> | ||
| − | == | + | == settings (overview) == |
<br /> | <br /> | ||
<gallery mode="packed-hover"> | <gallery mode="packed-hover"> | ||
| − | 01_IBUS-App_Einstellungen_01.png| | + | 01_IBUS-App_Einstellungen_01.png|setup menu |
| − | 01 IBUS-App Einstellungen 01a.png| | + | 01 IBUS-App Einstellungen 01a.png|search function in the I-BUS app settings |
</gallery> | </gallery> | ||
<br /> | <br /> | ||
| − | + | The settings are divided into different categories.<br /> | |
| − | * '''[[ | + | * '''[[App_settings#general_app_settings|general app settings]]''' |
| − | * '''[[ | + | * '''[[App_settings#Resler_module_settings|Resler module settings]]''' |
| − | * '''[[App_Einstellungen_v2#Bordcomputer Funktionen| | + | * '''[[App_Einstellungen_v2#Bordcomputer Funktionen|on-board computer]]''' |
| − | * '''[[App_Einstellungen_v2#IKE-Funktionen|IKE | + | * '''[[App_Einstellungen_v2#IKE-Funktionen|IKE settings]]''' |
| − | * '''[[App_Einstellungen_v2#Lichtfunktionen| | + | * '''[[App_Einstellungen_v2#Lichtfunktionen|light settings]]''' |
| − | * '''[[App_Einstellungen_v2#PDC_und_R.C3.BCckw.C3.A4rtsgang|PDC und | + | * '''[[App_Einstellungen_v2#PDC_und_R.C3.BCckw.C3.A4rtsgang|PDC und reverse]]''' |
| − | * '''[[App_Einstellungen_v2#GPS-Daten|GPS | + | * '''[[App_Einstellungen_v2#GPS-Daten|GPS data]]''' |
| − | * '''[[App_Einstellungen_v2#Zentralverriegelung| | + | * '''[[App_Einstellungen_v2#Zentralverriegelung|central lock]]''' |
| − | * '''[[App_Einstellungen_v2#Coming-.2FLeaving_Home| | + | * '''[[App_Einstellungen_v2#Coming-.2FLeaving_Home|coming/leaving home]]''' |
* '''[[App_Einstellungen_v2#DSP|DSP]]''' | * '''[[App_Einstellungen_v2#DSP|DSP]]''' | ||
| − | * '''[[App_Einstellungen_v2#Weitere_Einstellungen| | + | * '''[[App_Einstellungen_v2#Weitere_Einstellungen|other settings]]'''<br /> |
<br /> | <br /> | ||
| − | <big>''' | + | <big>'''NEW''' We have integrated a search function within the app settings so that you can search for functions without having to scroll through the menus.</big> |
<br /><br /><br /> | <br /><br /><br /> | ||
| − | === | + | === general app settings === |
<br /> | <br /> | ||
<gallery mode="packed-hover"> | <gallery mode="packed-hover"> | ||
| − | 02_IBUS-App_Einstellungen_Allg_01.png| | + | 02_IBUS-App_Einstellungen_Allg_01.png|general app settings |
| − | 02 IBUS-App Einstellungen Allg 14.jpg|USB | + | 02 IBUS-App Einstellungen Allg 14.jpg|USB interface: selection with connection |
| − | 02_IBUS-App_Einstellungen_Allg_04.png| | + | 02_IBUS-App_Einstellungen_Allg_04.png|select language |
| − | 02_IBUS-App_Einstellungen_Allg_05.png| | + | 02_IBUS-App_Einstellungen_Allg_05.png|fit font size |
| − | 02_IBUS-App_Einstellungen_Allg_06.png| | + | 02_IBUS-App_Einstellungen_Allg_06.png|themes |
| − | 02_IBUS-App_Einstellungen_Allg_07.png| | + | 02_IBUS-App_Einstellungen_Allg_07.png|start delay |
| − | 02_IBUS-App_Einstellungen_Allg_08.png|DAB+ | + | 02_IBUS-App_Einstellungen_Allg_08.png|DAB+ broadcasts |
| − | 02_IBUS-App_Einstellungen_Allg_09.png| | + | 02_IBUS-App_Einstellungen_Allg_09.png|change car series |
| − | 02_IBUS-App_Einstellungen_Allg_10.png| | + | 02_IBUS-App_Einstellungen_Allg_10.png|change units |
| − | 02_IBUS-App_Einstellungen_Allg_11.png| | + | 02_IBUS-App_Einstellungen_Allg_11.png|change units |
| − | 02_IBUS-App_Einstellungen_Allg_12.png| | + | 02_IBUS-App_Einstellungen_Allg_12.png|import/export |
| − | 02_IBUS-App_Einstellungen_Allg_13.png| | + | 02_IBUS-App_Einstellungen_Allg_13.png|import/export storage location |
</gallery><br /> | </gallery><br /> | ||
| − | ''' | + | '''options:'''<br /> |
| − | * USB | + | * disconnect USB connection (only for a short time - if the interface/module is found on the USB, the connection is re-established when the BC screen is opened) or connect it |
| − | * | + | * Selection of the USB interface ("R.Resler IBUS Interface V6b" or Resler module) |
| − | ** | + | ** up on v2.2.0.3, the connection (port) is also displayed in order to be able to use a TPMS (tyre pressure display) in addition to the module/interface, for example. It is recommended to connect the Resler interface/resler module to the green USB and the TPMS to the yellow USB. |
| − | ** | + | ** for recommended radios usually applies: |
| − | *** | + | *** red and green USB: port 1 |
| − | *** | + | *** Yellow USB: port 3 |
| − | * | + | * ignoring the USB port selection (for radios with problems when defining the port or changing port names) |
| − | * | + | * language and font size of the app (without changing the system language). Current languages: |
| − | ** | + | ** Bulgarian |
| − | ** | + | ** German |
| − | ** | + | ** English |
| − | ** | + | ** French |
| − | ** | + | ** Greek |
| − | ** | + | ** Italian |
| − | ** | + | ** Croatian |
| − | ** | + | ** Lithuanian |
| − | ** | + | ** Dutch |
| − | ** | + | ** Norwegian |
| − | ** | + | ** Polish |
| − | ** | + | ** Portuguese |
| − | ** | + | ** Romanian |
| − | ** | + | ** Russian |
| − | ** | + | ** Slovenian |
| − | ** | + | ** Spanish |
| − | ** | + | ** Traditional Chinese |
| − | ** | + | ** Czech |
| − | ** | + | ** Turkish |
| − | ** | + | ** Hungarian |
| − | * | + | * selection of defined themes |
| − | * | + | * full screen |
| − | * | + | * automatic start after reboot |
| − | * | + | * start delay |
| − | * | + | * app update check when starting the app |
| − | * | + | * automatic app start via USB (app starts when interface/module is recognised on USB) |
| − | * | + | * pop-up music broadcasts |
| − | * DAB+ | + | * DAB+ broadcasts |
| − | * | + | * change series, units + convert OEM values to other units |
| − | * | + | * import/export of settings |
| − | * | + | * delete app data |
<br /><br /><br /> | <br /><br /><br /> | ||
| − | === Resler | + | === Resler module settings === |
| − | <big> | + | <big>link to '''[[Resler Module Settings]]'''</big> |
<gallery mode="packed-hover"> | <gallery mode="packed-hover"> | ||
| − | RM_Einstellungen_01.jpg| | + | RM_Einstellungen_01.jpg|overview Resler module settings |
</gallery> | </gallery> | ||
<br /><br /><br /> | <br /><br /><br /> | ||
| − | === | + | === on-board computer functions === |
<br /> | <br /> | ||
<gallery mode="packed-hover"> | <gallery mode="packed-hover"> | ||
| − | 03_IBUS-App_Einstellungen_BC_01.png| | + | 03_IBUS-App_Einstellungen_BC_01.png|OBC functions menu |
| − | 03_IBUS-App_Einstellungen_BC_06.png| | + | 03_IBUS-App_Einstellungen_BC_06.png|power calculation settings |
| − | 03_IBUS-App_Einstellungen_BC_07.png| | + | 03_IBUS-App_Einstellungen_BC_07.png|power calculation settings |
| − | 03_IBUS-App_Einstellungen_BC_08.png| | + | 03_IBUS-App_Einstellungen_BC_08.png|maximum power (for bar) |
| − | 03_IBUS-App_Einstellungen_BC_09.png| | + | 03_IBUS-App_Einstellungen_BC_09.png|settings engine temperature |
| − | 03_IBUS-App_Einstellungen_BC_10.png| | + | 03_IBUS-App_Einstellungen_BC_10.png|settings engine temperature |
| − | 03_IBUS-App_Einstellungen_BC_11.png| | + | 03_IBUS-App_Einstellungen_BC_11.png|Transparency progress bar |
| − | 03_IBUS-App_Einstellungen_BC_12.png| | + | 03_IBUS-App_Einstellungen_BC_12.png|OBC spacings |
| − | 03_IBUS-App_Einstellungen_BC_13.png| | + | 03_IBUS-App_Einstellungen_BC_13.png|OBC choice |
| − | 03_IBUS-App_Einstellungen_BC_14.png| | + | 03_IBUS-App_Einstellungen_BC_14.png|OBC programme functions for display in IKE (cluster) |
| − | 03_IBUS-App_Einstellungen_BC_15.png| | + | 03_IBUS-App_Einstellungen_BC_15.png|OBC programme functions for display in IKE (cluster) |
| − | 03_IBUS-App_Einstellungen_BC_16.png| | + | 03_IBUS-App_Einstellungen_BC_16.png|OBC programme functions for display in IKE (cluster) |
| − | 03_IBUS-App_Einstellungen_BC_16a.png| | + | 03_IBUS-App_Einstellungen_BC_16a.png|OBC programme functions for display in IKE (cluster) |
| − | 03_IBUS-App_Einstellungen_BC_17.png| | + | 03_IBUS-App_Einstellungen_BC_17.png|target coolant |
| − | 03_IBUS-App_Einstellungen_BC_17a.png| | + | 03_IBUS-App_Einstellungen_BC_17a.png|source for oil temperature |
| − | 03_IBUS-App_Einstellungen_BC_18.png| | + | 03_IBUS-App_Einstellungen_BC_18.png|correction factor for oil temperature |
| − | 03_IBUS-App_Einstellungen_BC_19.png| | + | 03_IBUS-App_Einstellungen_BC_19.png|correction factor for voltage |
| − | 03_IBUS-App_Einstellungen_BC_20.png| | + | 03_IBUS-App_Einstellungen_BC_20.png|max. fuel tank capacity |
| − | 03_IBUS-App_Einstellungen_BC_21.png| | + | 03_IBUS-App_Einstellungen_BC_21.png|position for title informations |
| − | 03_IBUS-App_Einstellungen_BC_22.png| | + | 03_IBUS-App_Einstellungen_BC_22.png|font size for small elements |
| − | 03_IBUS-App_Einstellungen_BC_23.png| | + | 03_IBUS-App_Einstellungen_BC_23.png|display format for the time and date |
| − | 03 IBUS-App Einstellungen BC 25.png| | + | 03 IBUS-App Einstellungen BC 25.png|interior temperature position - shift down by x pixels (BC High wide) or x pixels to the right (BC High) |
| − | 03 IBUS-App Einstellungen BC 24.png| | + | 03 IBUS-App Einstellungen BC 24.png|function for "long tap on car icon" |
| − | 03 IBUS-App Einstellungen BC 26.png| | + | 03 IBUS-App Einstellungen BC 26.png|function for "double tap on car icon" |
| − | 03 IBUS-App Einstellungen BC 27.png| | + | 03 IBUS-App Einstellungen BC 27.png|"background image" menu |
| − | 03 IBUS-App Einstellungen BC 28.png| | + | 03 IBUS-App Einstellungen BC 28.png|"background image" menu - select storage |
| − | 03 IBUS-App Einstellungen BC 29.png| | + | 03 IBUS-App Einstellungen BC 29.png|"background image" menu - reset/remove background image or select image file folder |
| − | 03 IBUS-App Einstellungen BC 30.png| | + | 03 IBUS-App Einstellungen BC 30.png|"background image" menu - reset/remove background image or select image file |
| − | 03 IBUS-App Einstellungen BC 31.png| | + | 03 IBUS-App Einstellungen BC 31.png|"background image" menu - set the transparency of the background image |
| − | 03 IBUS-App Einstellungen BC 32.png| | + | 03 IBUS-App Einstellungen BC 32.png|"background image" menu - customise background colour |
| − | 03 IBUS-App Einstellungen BC 33.png| | + | 03 IBUS-App Einstellungen BC 33.png|"background image" menu - customise background colour => 100% transparent |
| − | 03 IBUS-App Einstellungen BC 34.png| | + | 03 IBUS-App Einstellungen BC 34.png|"background image" menu - customise background colour as hexacode |
| − | 03 IBUS-App Einstellungen BC 35.png| | + | 03 IBUS-App Einstellungen BC 35.png|"background image" menu - example with background image |
| − | Wallpaper 1024x540px.png| | + | Wallpaper 1024x540px.png|example background image for 7" display: 1024x540 pixels |
</gallery> | </gallery> | ||
<br /> | <br /> | ||
| − | ''' | + | '''The following options are available in the on-board computer (OBC) settings:'''<br /> |
| − | * | + | * enter basic data for power, torque and temperature calculation<sup>1</sup> |
| − | * | + | * transparency of the progress bar (0 = full colour, 100 = invisible) |
| − | * | + | * specify top, bottom, left and right distances for on-board computer |
| − | * | + | * set whether you have a large or small BC (see above) or which layout you want |
| − | * LowBC | + | * LowBC calculations (calculates average consumption from distance travelled and tank capacity) |
| − | * | + | * show/hide reset buttons [without reset buttons, the value is reset to the numerical value(!!!) via tap and hold]. |
| − | * Prog | + | * changing the Prog functions of the OBC |
| − | * | + | * specify and automatically set engine start disable code |
| − | * | + | * colour change for coolant and oil temperature (cold - blue, white - at operating temperature, red - hot) |
| − | * | + | * display of the oil temperature and definition of the calculation (LCM 3 or 4, [https://xtrons.ibus-app.de/index.php?title=DeepOBD_-_Adapter_und_App_einrichten DeepOBD], eKombi,.. )<sup>2</sup> |
| − | * | + | * correction factors for oil temperature and voltage display |
| − | * | + | * show/hide voltage, power, engine temperature, fuel level and OBD screen (only required to display data from the app "[https://xtrons.ibus-app.de/index.php?title=DeepOBD_-_Adapter_und_App_einrichten Deep OBD]" to receive and display values) |
| − | * | + | * specification of the maximum speed and the chime speed when the motor is cold, plus (de)activation of the chime |
| − | * MID | + | * emulate MID queries (MID emulation) - ''possibly necessary if only OEM radio (no sat nav) was installed before the Android head unit. OPTIONALLY you can recode the "Anzeigegerät" in the High BC speedometer to "bordmonitor".'' |
| − | * | + | * Function for "Long press on vehicle image" (at OBC and PDC screen) [among other things, the hydraulic tailgate can be opened and closed here<sup>3</sup>] |
| − | * | + | * display of CPU temperature and utilisation (if supported by the radio) |
| − | * | + | * move the interior temperature display downwards (for "BC High Wide" on-board computer layout) or to the right (for "BC High" on-board computer layout) |
| − | * | + | * set functions for long and double tap on car icon |
| − | * | + | * activate Christmas mode (it "snows" in the app if you have set a light sequence (1-6) for "double tap" - in addition to the light sequence, and also in the "About" menu) |
| − | * | + | * customise the background of the "on-board computer screen" |
| − | ** | + | ** set a background image and adjust its transparency |
| − | ** | + | ** reset: select background image ==> select storage location and then select the "remove background image" item |
| − | ** | + | ** adjust the background colour (either with transparency behind the image or without the image). The colour can be selected in the colour wheel, as well as the saturation, brightness and transparency. Optionally, you can set the ARGB value directly. |
| − | ** | + | ** If the "grey fields" around the values are missing on the on-board computer image ==> set the transparency of the colour to 100% (right slider all the way up) - only works WITHOUT the background image set! |
<br /> | <br /> | ||
<br /> | <br /> | ||
| − | <sup>3</sup> | + | <sup>3</sup> When opening/closing the tailgate from the passenger compartment, the operator must ensure that there is no risk of property damage/personal injury! The operators of the app accept no liability for this! |
<br /> | <br /> | ||
<br /> | <br /> | ||
| − | ==== | + | ==== accuracy of power and torque calculation ==== |
| − | <sup>1</sup> | + | <sup>1</sup> The power/torque calculation is based on the speed determined by the GPS from which the acceleration is calculated from two values. GPS positioning has an accuracy of approx. 2-3 metres and is only updated approx. every second. A "wheel power" is calculated using parameters such as vehicle mass, frontal surface, air resistance, etc., i.e. the displayed value will generally reach a maximum of ~70% of the engine power (we cannot record the drag power).<br /> |
| − | + | To calculate the torque we use the proportionality to the speed and calculate the torque from the (wheel) power determined above. Since without [https://xtrons.ibus-app.de/index.php?title=DeepOBD_-_Adapter_und_App_einrichten DeepOBD] we only get a new speed from the tacho every ~1.5s, and only in steps of 100 rpms, the value is correspondingly "accurate".<br /> | |
| − | + | In short: these values are to be seen more as a toy and have no actual relation to a measurement on a dynamometer.<br /><br /> | |
| − | ==== | + | ==== accuracy of engine and oil temperature plus oil level ==== |
| − | + | The engine temperature is also a calculated value. The specified oil quantity and other parameters are used to calculate when the engine oil should be at operating temperature. Only when this is reached is the gong warning (if active) switched off completely if the specified engine speed is exceeded. If the coolant temperature is no longer displayed as cold, the speed of the gong warning is already increased by 1000 rpm.<br /> | |
<br /> | <br /> | ||
| − | <sup>2</sup> | + | <sup>2</sup>The oil temperature and the engine oil level are determined from the values of the TÖNS (thermal oil level sensor). This function is not available for BMW E46 and E83 (without additional hardware) as the sensor is not connected to the LSZ (light check module). If no value or an implausible value is displayed, it can be assumed that the TÖNS is defective. A corresponding error will be stored in the LCM/LSZ. If a so-called "eKombi module" is installed, e.g. in the E46, the value can be displayed via this, or also via the app "[https://xtrons.ibus-app.de/index.php?title=DeepOBD_-_Adapter_und_App_einrichten DeepOBD]".<br /> |
| − | ''' | + | '''Note:''' The value is '''NOT'''' determined from a real oil temperature sensor that may be present and does not correlate 100% with values from such a sensor. This also applies to the oil level: the value is more informative than qualitative. A "10" does not mean that "10% of the level between MIN and MAX" has been measured. If in doubt, please always check the oil level on the dipstick!<br /> |
| − | ''' | + | '''Note:''' The oil level can be adjusted to "centre" (short click) or "MAX" (long click) in the "vehicle information" menu. |
<br /><br /><br /> | <br /><br /><br /> | ||
| − | === IKE | + | === IKE settings=== |
<br /> | <br /> | ||
<gallery mode="packed-hover"> | <gallery mode="packed-hover"> | ||
| − | 04_IBUS-App_Einstellungen_IKE_01.png|IKE | + | 04_IBUS-App_Einstellungen_IKE_01.png|IKE menu |
| − | 04_IBUS-App_Einstellungen_IKE_03.png| | + | 04_IBUS-App_Einstellungen_IKE_03.png|welcome message |
| − | 04_IBUS-App_Einstellungen_IKE_04.png| | + | 04_IBUS-App_Einstellungen_IKE_04.png|display duration for welcome message |
| − | 04_IBUS-App_Einstellungen_IKE_05.png| | + | 04_IBUS-App_Einstellungen_IKE_05.png|display type for welcome message |
| − | 04_IBUS-App_Einstellungen_IKE_06.png| | + | 04_IBUS-App_Einstellungen_IKE_06.png|source oil temperatur |
| − | 04_IBUS-App_Einstellungen_IKE_07.png| | + | 04_IBUS-App_Einstellungen_IKE_07.png|standard OBC value to be displayed in IKE |
| − | 04_IBUS-App_Einstellungen_IKE_08.png| | + | 04_IBUS-App_Einstellungen_IKE_08.png|scroll speed IKE |
| − | 04_IBUS-App_Einstellungen_IKE_09.png|IKE | + | 04_IBUS-App_Einstellungen_IKE_09.png|IKE requests |
| − | 04_IBUS-App_Einstellungen_IKE_09a.png| | + | 04_IBUS-App_Einstellungen_IKE_09a.png|notification access - rights query |
| − | 04_IBUS-App_Einstellungen_IKE_09b.png| | + | 04_IBUS-App_Einstellungen_IKE_09b.png|notification access |
</gallery> | </gallery> | ||
<br /> | <br /> | ||
| − | ''' | + | '''IKE functions can only be used if the High BC cluster.'''<br /> |
| − | * | + | * welcome message in the cluster display when starting the I-BUS app |
| − | * | + | * display duration for welcome message |
| − | * | + | * display one value in IKE display as standard (speed, coolant or oil temperature, voltage, no value) |
| − | * | + | * display of the volume in the IKE (PX3/PX5/PX6/Qualcomm devices only) |
| − | * | + | * display of the PDC distances in the IKE (when PDC is active) |
| − | * | + | * display of music broadcasts in IKE (only from certain apps) |
| − | * | + | * set IKE scroll speed |
| − | * | + | * odometer reading querys (deactivating the odometer reading query is only relevant for older estates before 7/98, as these may no longer display active lights). |
| − | * | + | * select/deselect individual IKE queries |
| − | * | + | * navigation informations in IKE display<sup>4</sup><br /> |
<br /> | <br /> | ||
| − | <sup>4</sup> | + | <sup>4</sup> The information display only works for speedometers with High BC and in the E46 from KMB_E46.C03 (with suitable coding - only the distance to the next junction). Information can only be displayed if notification access is activated (Android setup → Apps → Special access → Notification access → Activate for "I-BUS App").<br /> |
| − | + | The following apps can display information: Google Maps, Sygic GPS, Here WeGo and Magic Earth (Magic Earth only sends information when it is running in the background!) | |
<br /><br /><br /> | <br /><br /><br /> | ||
| − | === | + | === light functions=== |
<br /> | <br /> | ||
<gallery mode="packed-hover"> | <gallery mode="packed-hover"> | ||
| − | 05_IBUS-App_Einstellungen_Light_01.png| | + | 05_IBUS-App_Einstellungen_Light_01.png|light functions menu - light control active via app |
| − | 05_IBUS-App_Einstellungen_Light_01a.png| | + | 05_IBUS-App_Einstellungen_Light_01a.png|light functions menu - light control via Resler module active (if available) |
| − | 05_IBUS-App_Einstellungen_Light_03.png| | + | 05_IBUS-App_Einstellungen_Light_03.png|number of tip flashes |
| − | 05_IBUS-App_Einstellungen_Light_04.png|max. | + | 05_IBUS-App_Einstellungen_Light_04.png|max. speed for cornering light |
| − | 05_IBUS-App_Einstellungen_Light_05.png| | + | 05_IBUS-App_Einstellungen_Light_05.png|follow-up time for cornering light |
| − | 05_IBUS-App_Einstellungen_Light_06.png| | + | 05_IBUS-App_Einstellungen_Light_06.png|daytime running light options |
| − | 05_IBUS-App_Einstellungen_Light_07.png| | + | 05_IBUS-App_Einstellungen_Light_07.png|daytime running light start |
| − | 05 IBUS-App Einstellungen Light 08.png| | + | 05 IBUS-App Einstellungen Light 08.png|Motorway lights |
</gallery> | </gallery> | ||
<br /> | <br /> | ||
| − | ''' | + | '''options:''' |
| − | * | + | * switching whether I-BUS app or [[Resler module]] should implement the light functions |
| − | * | + | * number of tip flashes (0-7x) |
| − | * | + | * speed limit for cornering light (activation of the respective fog light when indicator is active) |
| − | * | + | * follow-up time of the cornering light |
| − | * | + | * Options for daytime running light (parking light front and rear, fog lights, ambient light) |
| − | * | + | * start daytime running light with ignition level 1 or 2 |
| − | * | + | * cornering light for tip flashing |
| − | * | + | * cornering light always active (only on with active parking or dipped beam as standard) <br /> |
| − | ''' | + | '''Note:'''' The cornering light is activated parallel to the indicator not via the steering wheel position (no access to the sensor!). |
<br /><br /><br /> | <br /><br /><br /> | ||
| − | === PDC | + | === PDC and reverse gear === |
<br /> | <br /> | ||
<gallery mode="packed-hover"> | <gallery mode="packed-hover"> | ||
| − | 06_IBUS-App_Einstellungen_PDC_01.png|PDC | + | 06_IBUS-App_Einstellungen_PDC_01.png|PDC menu |
| − | 06_IBUS-App_Einstellungen_PDC_03.png| | + | 06_IBUS-App_Einstellungen_PDC_03.png|volume during active reverse gear |
| − | 06_IBUS-App_Einstellungen_PDC_04.png|PDC | + | 06_IBUS-App_Einstellungen_PDC_04.png|PDC picture |
| − | 06_IBUS-App_Einstellungen_PDC_05.png| | + | 06_IBUS-App_Einstellungen_PDC_05.png|time kerb control |
</gallery> | </gallery> | ||
| − | ''' | + | '''options:''' |
| − | * PDC | + | * hide front PDC (if not available) |
| − | * | + | * volume reduction when reverse gear is active (only PX3/PX5/PX6/Qualcom devices, useful if no reversing camera is used) |
| − | * PDC | + | * PDC screen change when PDC is active |
| − | ** '''PDC | + | ** '''PDC screen change:''' I-BUS app is active in the foreground, PDC switches on → Switch to the PDC screen |
| − | ** '''PDC | + | ** '''PDC screen change 2:''' for the option above, immediately switches back to BC screen when reverse gear is ntlonger engaged not only when the PDC is off (for vehicles WITHOUT PDC at the front) |
| − | ** '''PDC | + | ** '''PDC change to the foreground:''' I-BUS app is NOT active in the foreground, PDC switches on → Switch to the PDC screen of the I-BUS app (and back to the previous app after switching off see selection above) |
| − | ** '''PDC | + | ** '''PDC screen pop-up:''' I-BUS app is NOT active in the foreground, PDC switches on → an image of the vehicle appears, adjustable in size and position, with the PDC distances (only when an obstacle appears!!!) above the current app (incl. reversing camera) until switch-off criterion (see above) |
| − | *** | + | *** change size: double-tap on the icon |
| − | *** | + | *** change position: tap and hold the icon for 2 seconds, then move it |
| − | * | + | * reverse change already when reverse gear is no longer active |
| − | * PDC | + | * PDC image of the vehicle |
| − | * | + | * automatic kerb control plus optional driver's mirror and adjustable time (determines how far the mirror lowers) |
| − | * | + | * activation of the recirculation function when reverse gear is active (prevents the intake of own exhaust gases) |
<br /><br /><br /> | <br /><br /><br /> | ||
| − | === GPS | + | === GPS data === |
<br /> | <br /> | ||
<gallery mode="packed-hover"> | <gallery mode="packed-hover"> | ||
| − | 07_IBUS-App_Einstellungen_GPS_01.png| | + | 07_IBUS-App_Einstellungen_GPS_01.png|displayable GPS data |
</gallery> | </gallery> | ||
| − | ''' | + | '''display of GPS determined:''' |
| − | * | + | * address (Internet connection required) |
| − | * | + | * altitude |
| − | * | + | * speed |
| − | * | + | * compass |
| − | + | All GPS data can be displayed simultaneously.<br /> | |
<br /><br /><br /> | <br /><br /><br /> | ||
| − | === | + | === central locking system === |
<br /> | <br /> | ||
<gallery mode="packed-hover"> | <gallery mode="packed-hover"> | ||
| − | 08_IBUS-App_Einstellungen_ZV_01.png| | + | 08_IBUS-App_Einstellungen_ZV_01.png|central locking system menu |
| − | 08_IBUS-App_Einstellungen_ZV_04.png| | + | 08_IBUS-App_Einstellungen_ZV_04.png|automatic locking up on xx km/h |
| − | 08_IBUS-App_Einstellungen_ZV_05.png| | + | 08_IBUS-App_Einstellungen_ZV_05.png|telegram for central locking |
| − | 08_IBUS-App_Einstellungen_ZV_06.png| | + | 08_IBUS-App_Einstellungen_ZV_06.png|comfort closing up on xx km/h |
| − | 08_IBUS-App_Einstellungen_ZV_07.png| | + | 08_IBUS-App_Einstellungen_ZV_07.png|telegram for closing sunroof |
</gallery><br /> | </gallery><br /> | ||
| − | ''' | + | '''options:''' |
| − | * | + | * show/hide the status of the central lock |
| − | * | + | * automatic locking up on an adjustable speed |
| − | * | + | * automatic unlocking when the ignition is switched off or the handbrake is applied (only with High BC) |
| − | * | + | * change the telegram for central lock and/or the sunroof (if necessary - '''in case of malfunction, please test another telegram!''') |
| − | * | + | * constant display of the vehicle silhouette even when the doors/flaps are closed |
| − | * | + | * open bonnet display (only with anti-theft system from factory) |
| − | * | + | * (un)folding the mirrors (if available)<sup>5</sup> |
| − | * | + | * comfort closing of the windows/sliding roof when the ignition is switched off<sup>6</sup> |
| − | * | + | * comfort closing of the windows/sliding roof when a defined speed is exceeded<sup>6</sup> |
| − | * | + | * mirroring the doors (for vehicles with right-hand drive) |
| + | * open door volume (sets current volume to set "reverse volume" in "PDC and reverse" menu - when any doors is opened and goes back to old volume when door was closed again) | ||
<br /><br /> | <br /><br /> | ||
| − | <sup>5</sup> | + | <sup>5</sup>Activation of the mirrors is automatically paused if they are activated too often in quick succession.<br /> |
| − | <sup>6</sup> | + | <sup>6</sup>The power windows and sunroof are controlled via a "diagnostic command". NO interruption is possible during this activation, i.e. the window/roof are first closed completely. A new activation is only possible a few seconds after the movement has been completed.<br /> |
| − | ''' | + | '''Attention: DANGER OF INJURY:''' The "pinch protection" is NOT active during comfort closing, i.e. the window and/or roof close and do NOT stop if something gets stuck in between. '''Attention: DANGER OF INJURY''' |
<br /><br /><br /> | <br /><br /><br /> | ||
=== Coming-/Leaving Home === | === Coming-/Leaving Home === | ||
<br /> | <br /> | ||
| + | <font color="red">'''This setting is a remnant of the I-BUS app before the Resler module! Using the Resler module makes this option obsolete. Please use the settings in the Resler module!'''</font><br /><br /> | ||
| + | '''[https://wiki.ibus-app.de/index.php?title=Resler_Module_Settings#Coming.2FLeaving_Home Resler Modul => coming/leaving home]'''<br /> | ||
| + | <br /> | ||
| + | <font color="grey">' | ||
<gallery mode="packed-hover"> | <gallery mode="packed-hover"> | ||
| − | 09_IBUS-App_Einstellungen_CLH_01.png| | + | 09_IBUS-App_Einstellungen_CLH_01.png|coming/leaving home menu |
| − | 09_IBUS-App_Einstellungen_CLH_03.png| | + | 09_IBUS-App_Einstellungen_CLH_03.png|time setting for coming/leaving home |
| − | 09_IBUS-App_Einstellungen_CLH_04.png| | + | 09_IBUS-App_Einstellungen_CLH_04.png|select lighting control memory number |
| − | 09_IBUS-App_Einstellungen_CLH_05.png| | + | 09_IBUS-App_Einstellungen_CLH_05.png|select consumer shutdown telegram |
| − | 09 IBUS-App Einstellungen CLH 06.png| | + | 09 IBUS-App Einstellungen CLH 06.png|select coming home start signal |
</gallery> | </gallery> | ||
<br /> | <br /> | ||
| − | ''' | + | '''To use the Coming/Leaving Home functions, the radio's power supply must be switched to consumer shutdown (CS)! → [[Radio auf Verbraucherabschaltung umklemmen|reconnecting radio to consumer shutdown]]''' |
<br /><br /> | <br /><br /> | ||
| − | ''' | + | '''options:'''<br /> |
| − | * | + | * Activation of consumer shutdown, coming/leaving home |
| − | * | + | * Time slots for coming/leaving home |
| − | * | + | * Light function memory number |
| − | * | + | * Modification of the CS telegram and the coming home start signal '''[Both must be set to suit the vehicle and according to the desired switch-on time.!!!!]''' |
<br /> | <br /> | ||
| − | ''' | + | '''note:'''<br /> |
| − | + | Coming/Leaving Home via consumer shutdown is not a core function of the app, but rather an experimental attempt to implement this function. '''100% functionality cannot be guaranteed.''' | |
<br /><br /><br /> | <br /><br /><br /> | ||
| − | ==== | + | ==== Setting the consumer shutdown ==== |
| + | <br /> | ||
| + | In order for the consumer switch-off to function correctly, the [[Radio_auf_Verbraucherabschaltung_umklemmen|radio must be reconnected]] accordingly and this function must be set correctly. Unfortunately, as this cannot be done automatically, the appropriate setting must be tried out.<br /><br /> | ||
| − | + | Start by setting the '''Radio Consumer Shutdown''' to '''active'''.<br /><br /> | |
| − | |||
| − | |||
[[Datei:09 IBUS-App Einstellungen CLH 01.png|rahmenlos|ohne]]<br /><br /> | [[Datei:09 IBUS-App Einstellungen CLH 01.png|rahmenlos|ohne]]<br /><br /> | ||
| − | + | Next up is the ''' CS telegram''': The telegram must match the series - there may be several telegrams for the model.<br /><br /> | |
[[Datei:09 IBUS-App Einstellungen CLH 05.png|rahmenlos|ohne]]<br /><br /> | [[Datei:09 IBUS-App Einstellungen CLH 05.png|rahmenlos|ohne]]<br /><br /> | ||
| − | + | Then set the appropriate '''start signal'''. Please ensure that the desired signal is available.<br /> | |
| − | * | + | * immobiliser (EWS) |
| − | * | + | * lock (central lock) |
| − | * | + | * remote lock (wireless remote control) |
| − | * | + | * ignition off |
| − | * | + | * alarm system (arming the anti-theft alarm system) |
| − | + | Multiple selections are possible. Often the combination of '''Lock''' and '''remote Lock''' is sufficient.<br /><br /> | |
[[Datei:09 IBUS-App Einstellungen CLH 06.png|rahmenlos|ohne]]<br /><br /> | [[Datei:09 IBUS-App Einstellungen CLH 06.png|rahmenlos|ohne]]<br /><br /> | ||
| − | + | Finally, set the '''start time''' for the morning and evening. I.e. until when the lights should still be on tomorrow and from when in the evening. If you want them to be on all the time set the morning and evening times to 12:00.<br /><br /> | |
| − | + | If the settings are correct the radio should switch off a few (!) seconds after the start signal and the LED on the automatic gear lever (if present) and the glove compartment light (if open!) should switch off.<br /> | |
| − | + | When you unlock the vehicle the radio should start up again and the lights should come on.<br /> | |
| − | + | If '''lighting controls''' are defined, the function is active (check box selected) and assigned to the coming/leaving home functions - these should start accordingly. See chapter [[App_Einstellungen_v2#Lichtsteuerung|Lichtsteuerung]]</font> | |
<br /><br /><br /><br /> | <br /><br /><br /><br /> | ||
| Zeile 559: | Zeile 562: | ||
<br /> | <br /> | ||
<gallery mode="packed-hover"> | <gallery mode="packed-hover"> | ||
| − | 10_IBUS-App_Einstellungen_DSP_01.png|DSP | + | 10_IBUS-App_Einstellungen_DSP_01.png|DSP menu |
| − | 10_IBUS-App_Einstellungen_DSP_02.png| | + | 10_IBUS-App_Einstellungen_DSP_02.png|Start delay 2. DSP star |
| − | 10_IBUS-App_Einstellungen_DSP_03.png|DSP | + | 10_IBUS-App_Einstellungen_DSP_03.png|DSP start level |
| − | 14 IBUS-App DSP 04.png|DSP | + | 14 IBUS-App DSP 04.png|DSP start – short tap on DSP icon |
| − | 10 IBUS-App Einstellungen DSP 04.jpg|DSP | + | 10 IBUS-App Einstellungen DSP 04.jpg|DSP volume levels |
| − | 10 IBUS-App Einstellungen DSP 05.jpg| | + | 10 IBUS-App Einstellungen DSP 05.jpg|CD changer connection type |
| + | </gallery> | ||
| + | '''options:''' | ||
| + | * Show DSP button on BC screen | ||
| + | * Fixed radio volume (only DSP is changed or the radio is always assigned the same volume when changed) | ||
| + | * DSP restart after engine start | ||
| + | * Delay time for second start | ||
| + | * DSP start level (level set each time the app is started) | ||
| + | * DSP volume buttons (instead of slider) | ||
| + | * Adjustment of DSP volume levels | ||
| + | * Display of equaliser values | ||
| + | * Selection of CD changer connection type<br /><br /> | ||
| + | '''note:''' over the years some manufacturers have managed to address the DSP in such a way that it is starts DSP amp once with an unknown set of parameters. This may cause the DSP to output sound but often at much to high volume. This is only noticed when the 'amplifier' function is set to 'no amplifier' (usually in the general factory settings or under 'CAN'). Once set this way there is no sound until the I-BUS app starts.<br /> | ||
| + | * Xtrons PB-/PQ-/IQ- series: factory settings => CAN => amplifier | ||
| + | * Xtrons IX-/PX- series: factory settings => general => amplifier | ||
| + | <gallery mode="packed-hover"> | ||
| + | 16 Werkseinstellungen CAN.jpeg|Xtrons PB-/PQ-/IQ- series: factory settings => CAN => amplifier | ||
| + | 800px-IX 1 Werkseinstellungen 1Grundeinstellungen.png|Xtrons IX-/PX- series: factory settings => general => amplifier | ||
</gallery> | </gallery> | ||
| − | |||
| − | |||
| − | |||
| − | |||
| − | |||
| − | |||
| − | |||
| − | |||
| − | |||
| − | |||
<br /> | <br /> | ||
<br /> | <br /> | ||
| − | ==== DSP | + | ==== DSP operating modes ==== |
| − | <big>''' | + | <big>'''There are two operating modes for the DSP:'''</big> |
| − | # '''" | + | # '''"fixed DSP volume"''' |
| − | # '''" | + | # '''"fixed radio volume (as original)'''<br /> |
<br /> | <br /> | ||
| − | + | Since the volume can be adjusted on both the radio and the original DSP power amplifier, it makes sense to set one of them to a fixed level. <br /><br /> | |
| − | <big>'''1. | + | <big>'''1. fixed DSP volume'''</big><br /> |
| − | + | This function is set 'ex works' in the app because it is easier to handle.<br /> | |
| − | + | For this you just need to set a 'start level' for the DSP which is set in the DSP power amplifier when the app is started. The DSP remains at this 'volume' level. Only the volume of the radio changes.<br /> | |
| − | + | Disadvantage: there is often background noise (static) and the sound quality is not as good as with a 'fixed radio volume'. | |
<br /><br /> | <br /><br /> | ||
| − | <big>'''2. | + | <big>'''2. fixed radio volume'''</big><br /> |
| − | + | Up to I-Bus App v2.1.4.2, the 'fixed radio volume' does not yet work very well. Up on I-Bus App v2.2 it can be used well.<br /> | |
| − | + | This is where the process is reversed: the volume of the radio is 'fixed' and - as with the original radio - I-BUS app only change the volume in the DSP power amplifier.<br /> | |
| − | + | However it is advisable to make a few adjustments: | |
| − | * | + | * setting the '''"fixed radio volume"''' function |
| − | * | + | * enable '''"DSP volume buttons"''' |
| − | * | + | * set the '''"DSP volume levels"''' to '''"2"''' |
| − | * | + | * enable '''"DSP equaliser values"''' |
| − | * '''DSP | + | * set '''"DSP start level"''' '''"[recommendation: 10]'''" |
| − | * | + | * set '''"radio volume at start"''' '''"[recommendation: 20]'''" ''(Only works with MTC-based radios with PX3/PX30/PX5/PX6/Qualcomm 665! See [https://xtrons.ibus-app.de/index.php?title=Hauptseite#Empfohlene_Radiomodelle recommended radios])'' |
<br /> | <br /> | ||
<br /> | <br /> | ||
| − | + | To '''set the radio 'default boot volume'''' at start-up go to the 'factory settings' of the radio:<br /> | |
| − | Android-Setup => CAR => | + | Android-Setup => CAR => factory settings (code: 126) => other => "Boot Default Volume": |
<gallery mode="packed-hover"> | <gallery mode="packed-hover"> | ||
10 IBUS-App Einstellungen DSP 06.jpg|Android-Einstellung - CAR | 10 IBUS-App Einstellungen DSP 06.jpg|Android-Einstellung - CAR | ||
| − | 10 IBUS-App Einstellungen DSP 07.jpg|Android-Einstellung - | + | 10 IBUS-App Einstellungen DSP 07.jpg|Android-Einstellung - factory settings(code: 126) |
| − | 10 IBUS-App Einstellungen DSP 08.jpg|Android-Einstellung - | + | 10 IBUS-App Einstellungen DSP 08.jpg|Android-Einstellung - factory settings- "others" - "Boot default Volume" |
</gallery> | </gallery> | ||
| − | <big>''' | + | <big>'''note:''' With this setting only the DSP volume (also displayed) can be changed using the steering wheel buttons and the radio. However the radio volume bar CANNOT be hidden. This means that it appears jumps up one level and then back again. The DSP volume - however - changes in the desired direction.<br /> |
| − | + | At least with steering wheel controls you can get around this but more on that later.</big> | |
<br /><br /><br /> | <br /><br /><br /> | ||
| − | === | + | === other settings === |
<br /> | <br /> | ||
<gallery mode="packed-hover"> | <gallery mode="packed-hover"> | ||
| − | 12_IBUS-App_Einstellungen_ADD_01.png| | + | 12_IBUS-App_Einstellungen_ADD_01.png|other settings |
| − | 12_IBUS-App_Einstellungen_ADD_06.png|2. | + | 12_IBUS-App_Einstellungen_ADD_06.png|2. app start |
| − | 12 IBUS-App Einstellungen ADD 07.png|BFD | + | 12 IBUS-App Einstellungen ADD 07.png|BFD lights |
| − | 12 IBUS-App Einstellungen ADD 08.png|BFD | + | 12 IBUS-App Einstellungen ADD 08.png|BFD lights |
| − | 12 IBUS-App Einstellungen ADD 09.png| | + | 12 IBUS-App Einstellungen ADD 09.png|size quick start |
| − | 12 IBUS-App Einstellungen ADD 10.png| | + | 12 IBUS-App Einstellungen ADD 10.png|set up quick start |
| − | 12 IBUS-App Einstellungen ADD 11.png| | + | 12 IBUS-App Einstellungen ADD 11.png|Example quick start |
| − | 12_IBUS-App_Einstellungen_ADD_Expert.png| | + | 12_IBUS-App_Einstellungen_ADD_Expert.png|expert mode |
| − | 12 IBUS-App Einstellungen ADD 12.png| | + | 12 IBUS-App Einstellungen ADD 12.png|customise SWC menu |
| − | 12 IBUS-App Einstellungen ADD 13.png| | + | 12 IBUS-App Einstellungen ADD 13.png|Adjust function selection for SWC |
</gallery> | </gallery> | ||
<br /> | <br /> | ||
| − | ''' | + | '''options:'''<br /> |
| − | * | + | * automatic setting of time and date (in BC) when the app starts |
| − | * | + | * SWC (for tablets or if no CAN BUS box is available)<sup>7</sup> |
| − | ** | + | ** from v2.2 onwards, the SWC buttons can also be assigned differently. Please note <sup>7</sup>! |
| − | * | + | * auxiliary heating selection (must be set to active if an “”'I-BUS controllable'“” auxiliary heater is installed) Note! Can only control an existing, original auxiliary heater! |
| − | * CD | + | * CD changer: displays the ‘CD changer’ menu for [https://wiki.ibus-app.de/index.php?title=Einbindung_des_Original_BMW_CD-Wechslers integration of the original CD changer]. |
| − | * | + | * mirror control: Show/hide the mirror control menu |
| − | * | + | * soft top: “'Function only in preparation”' |
| − | * OBD | + | * display OBD screen: Displays the ‘OBD’ tab for displaying values from the [https://xtrons.ibus-app.de/index.php?title=DeepOBD_-_Adapter_und_App_einrichten DeepOBD] app |
| − | * | + | * show/hide control and PDC screen |
| − | * | + | * flow control (should NOT be switched off!) |
| − | * | + | * display of expert mode in the menu (live display of BUS telegrams) |
| − | * | + | * activation of BrakeForceDisplay (BFD)<sup>8</sup>, selection of lights and their delay time |
| − | * | + | * SDVC: switch speed-dependent volume adjustment on/off |
| − | * | + | * Workshop mode: Disconnects the interface while this mode is active |
| − | * | + | * Quick start bar<sup>9</sup> [Size: off / small / large] |
| − | * | + | * automatic app start: Select up to two apps to start automatically after launching the I-BUS app. Additionally, the delay can be |
| − | |||
| − | |||
<br /> | <br /> | ||
| − | <sup>7</sup>''' | + | <sup>7</sup>'''ATTENTION: Activating this function while a CAN BUS box is connected at the same time may cause malfunctions!'''<br /> |
| − | ''' | + | '''note:''' If functions that deviate from the standard assignment (e.g. starting an app or standard Android functions) are set here, the standard function AND the newly set function will be executed when the button is pressed.<br /> |
| − | + | This can only be prevented by disconnecting/unplugging the [https://wiki.ibus-app.de/images/9/96/VA_Key2.jpg brown-black cable between the CAN-BUS box and the radio]! However, this means that the MFL buttons only work when the I-BUS app is running.<br /> | |
<br /> | <br /> | ||
| − | <sup>8</sup>BFD = Break Force Display. | + | <sup>8</sup>BFD = Break Force Display. For this function, the speedometer in the E39 must be at least model year 09/2001 and must be coded appropriately! In addition, DSC is necessary; ACS is not sufficient. The conditions for activating the BFD are anchored in the coding and cannot be influenced by the app.<br /> |
| − | + | What was BFD?<br /><br /> | |
<youtube>https://www.youtube.com/watch?v=HzPwApmKIYc</youtube><br /><br /> | <youtube>https://www.youtube.com/watch?v=HzPwApmKIYc</youtube><br /><br /> | ||
| − | <sup>9</sup> | + | <sup>9</sup>The quick start bar can be opened anywhere in the I-BUS app (except in Settings and Light Control) by swiping up from the bottom. Here you can set any shortcuts to apps that can be opened from the quick start bar. There is also the option to display the complete app list or the list of recently opened apps. To add an app tap the icon with the '''+'''. To remove an app tap and hold one of the icons. |
<br /><br /><br /> | <br /><br /><br /> | ||
| − | == | + | == navigation menu == |
<br /> | <br /> | ||
<gallery mode="packed-hover"> | <gallery mode="packed-hover"> | ||
| − | 00_IBUS-App_Start_Menue_01.png| | + | 00_IBUS-App_Start_Menue_01.png|navigation menu |
| − | 00_IBUS-App_Start_Menue_02.png| | + | 00_IBUS-App_Start_Menue_02.png|navigation menu |
</gallery> | </gallery> | ||
<br /> | <br /> | ||
| − | ''' | + | '''To open the navigation menu either tap the three lines in the top left corner or swipe right from the left edge.'''<br /> |
| − | In | + | In this menu you can switch between the different app screens: <br /> |
| − | * BC | + | * BC screen |
| − | * | + | * Coding |
| − | * | + | * Vehicle information |
| − | * | + | * Light control |
| − | * DSP ( | + | * DSP (if available and licence purchased) |
| − | * Update | + | * Check for Update |
| − | * | + | * Settings |
| − | * | + | * Activate |
<br /><br /><br /> | <br /><br /><br /> | ||
| − | === | + | === Coding=== |
<br /> | <br /> | ||
<gallery mode="packed-hover"> | <gallery mode="packed-hover"> | ||
| − | 13_IBUS-App_Coding_01.png| | + | 13_IBUS-App_Coding_01.png|Home page with panic button |
| − | 13_IBUS-App_Coding_02.png| | + | 13_IBUS-App_Coding_02.png|Control unit selection |
| − | 13_IBUS-App_Coding_03.png| | + | 13_IBUS-App_Coding_03.png|LCM selection |
| − | 13_IBUS-App_Coding_04.png|LCM | + | 13_IBUS-App_Coding_04.png|LCM successfully read |
| − | 13_IBUS-App_Coding_05.png| | + | 13_IBUS-App_Coding_05.png|Parameters using LCM as an example |
| − | 13_IBUS-App_Coding_06.png| | + | 13_IBUS-App_Coding_06.png|Parameters using LCM as an example |
| − | 13_IBUS-App_Coding_07.png| | + | 13_IBUS-App_Coding_07.png|Parameters using LCM as an example |
| − | 13_IBUS-App_Coding_08.png| | + | 13_IBUS-App_Coding_08.png|Light selection for home lights |
| − | 13_IBUS-App_Coding_09.png|LCM | + | 13_IBUS-App_Coding_09.png|LCM successfully coded |
| − | 13_IBUS-App_Coding_10.png| | + | 13_IBUS-App_Coding_10.png|PDC selection |
| − | 13_IBUS-App_Coding_11.png|LCM | + | 13_IBUS-App_Coding_11.png|LCM successfully read |
| − | 13_IBUS-App_Coding_12.png| | + | 13_IBUS-App_Coding_12.png|Parameters using PDC as an example |
| − | 13_IBUS-App_Coding_13.png| | + | 13_IBUS-App_Coding_13.png|Parameters using PDC as an example |
</gallery> | </gallery> | ||
<br /> | <br /> | ||
| − | ''' | + | '''The panic button resets all US coding of the lighting control unit with a single click.'''<br /><br /> |
| − | + | procedure:''' | |
| − | # | + | # Select a control unit (LCM/LSZ, PDC, DSP) |
| − | # | + | # Read coding data |
| − | # | + | # The message ‘Coding data successfully read’ appears |
| − | # | + | # Change the desired parameters |
| − | # | + | # Write coding data |
| − | # | + | # The message ‘Coding successfully completed’ appears |
<br /> | <br /> | ||
| − | + | In addition once the coding data has been read it can be changed and written as often as desired. | |
<br /> | <br /> | ||
| − | '''"''Reset''" | + | '''"''Reset''" performs factory coding.'''<br /><br /> |
| − | ''' | + | '''Note for daytime running lights E38, E39 [DRL Denmark]'''<br /><br /> |
| − | In | + | In Denmark, Sweden, Norway (and Canada) it is a legal requirement to have your headlights (low beam) switched on during the day. This function is called 'daytime running lights'. |
| − | + | For ECE vehicles with the country specifications 'Germany', 'Austria' and 'Switzerland' the 'light check module' can now be recoded for the 'daytime running lights' function.<br /> | |
| − | ''''' | + | '''''functions:'''''<br /> |
| − | + | The light switch must be set to position 'II' (low beam active). When the ignition is switched to 'ON' the low beam and rear lights are automatically switched on. When the ignition is switched to 'OFF' all of the vehicle's exterior lights are switched off.<br /> | |
| − | + | The daytime running light functions in the same way as the 'Denmark' version. The 'Norway' variant in which the running light is activated when the light switch is off (and the ignition is 'ON') was deliberately not chosen so that the customer can switch the function on or off as desired. | |
<br /><br /><br /> | <br /><br /><br /> | ||
| − | === | + | === car infos === |
<br /> | <br /> | ||
<gallery mode="packed-hover"> | <gallery mode="packed-hover"> | ||
| − | 00_IBUS-App_Start_AppInfo.png| | + | 00_IBUS-App_Start_AppInfo.png|car information |
| − | 00_IBUS-App_Start_AppInfo_01.png| | + | 00_IBUS-App_Start_AppInfo_01.png|service reminder |
| − | 00_IBUS-App_Start_AppInfo_02.png| | + | 00_IBUS-App_Start_AppInfo_02.png|check control messages |
| − | 00_IBUS-App_Start_AppInfo_03.png| | + | 00_IBUS-App_Start_AppInfo_03.png|active lights |
</gallery> | </gallery> | ||
| − | ''' | + | '''display of:'''<br /> |
| − | * | + | * Vehicle type |
| − | * | + | * Language |
| − | * | + | * Units |
| − | * | + | * Last service before... |
| − | * VIN ( | + | * VIN ([[App_Einstellungen_v2#Aktivieren_der_I-BUS_App|required to activate the app]]) |
| − | * | + | * Current gear (only for automatic transmissions - shift levers only show N or R) |
| − | * | + | * Oil level (only with intact TÖNS = thermal oil level sensor and not for vehicles with LSZ) |
<br /> | <br /> | ||
| − | ''' | + | '''note:''' 'oil level' is NOT a measuring instrument in meaning that the value does not reflect the exact level. The value must not fall below the minimum but that is all it tells you! |
<br /><br /><br /> | <br /><br /><br /> | ||
| − | === | + | === light control=== |
<br /> | <br /> | ||
<gallery mode="packed-hover"> | <gallery mode="packed-hover"> | ||
| − | 9_IBUS-App_Lichtsteuerung.png| | + | 9_IBUS-App_Lichtsteuerung.png|Home page Lighting control |
| − | 9_IBUS-App_Lichtsteuerung1.png| | + | 9_IBUS-App_Lichtsteuerung1.png|Select lights |
| − | 9_IBUS-App_Lichtsteuerung2.png| | + | 9_IBUS-App_Lichtsteuerung2.png|Load light sequence |
| − | 9_IBUS-App_Lichtsteuerung3.png| | + | 9_IBUS-App_Lichtsteuerung3.png|Import light sequence |
| − | 9_IBUS-App_Lichtsteuerung4.png| | + | 9_IBUS-App_Lichtsteuerung4.png|Save light sequence |
| − | 9_IBUS-App_Lichtsteuerung5.png| | + | 9_IBUS-App_Lichtsteuerung5.png|Export light sequence |
| − | 9_IBUS-App_Lichtsteuerung6.png| | + | 9_IBUS-App_Lichtsteuerung6.png|Example light sequence |
</gallery> | </gallery> | ||
<br /> | <br /> | ||
| − | In | + | In the lighting control system, lighting sequences can be: |
| − | * | + | * created |
| − | * | + | * saved to memory locations 1-6 |
| − | * | + | * written to the Resler module as CH/LH |
| − | * | + | * exported |
| − | * | + | * loaded from memory locations 1-6 |
| − | * | + | * imported from the Resler module |
| − | * | + | * imported as a file<br /><br /> |
| − | + | '''procedure:'''<br /> | |
| − | ''' | + | # Click on ‘Select light’ to open a list of all available lights. |
| − | # | + | # After selecting the light, set the timer for how long these lights should be active (no selection = pause). |
| − | # | + | # Add the selected light sequence. |
| − | # | + | # Repeat steps 1-3. |
| − | # | ||
<br /> | <br /> | ||
| − | ''' | + | '''notes:''' |
| − | * | + | * briefly tapping 'delete' removes the last light sequence |
| − | * | + | * tapping and holding deletes the entire list |
| − | * | + | * tapping on a list item plays it |
| − | * | + | * tapping and holding on a list item copies the selected lights with timer and adds them to the upper selection |
| − | * | + | * tapping on 'Play' showns the entire light sequence |
| − | * | + | * light sequences can be stored in 6 memories and reloaded and can also be exported and imported as XML files |
| − | * | + | * light sequence in memory 1 can be activated by pressing the light horn twice |
| − | * | + | * memories 2 - 6 can be assigned to Coming/Leaving Home. A sequence must be stored here for each one to be activated. |
<br /><br /> | <br /><br /> | ||
| − | ==== | + | ==== Downloading and inserting sample light sequences ==== |
| − | + | At '''Load''' there is '''Import''' where you can insert sequences created on your PC or [https://download.ibus-app.de/Lightshow/I-BUS_App_%20Lightshows.zip sample sequences] for example. | |
<br /><br /><br /> | <br /><br /><br /> | ||
| Zeile 778: | Zeile 785: | ||
<br /> | <br /> | ||
<gallery mode="packed-hover"> | <gallery mode="packed-hover"> | ||
| − | 14_IBUS-App_DSP_01.png| | + | 14_IBUS-App_DSP_01.png|Home page DSP / Equaliser |
| − | 14_IBUS-App_DSP_02.png|DSP: | + | 14_IBUS-App_DSP_02.png|DSP: Room / Hall |
| − | 14_IBUS-App_DSP_03.png|DSP: Balance/Fader/ | + | 14_IBUS-App_DSP_03.png|DSP: Balance/Fader/Treble/Bass |
| − | 14 IBUS-App DSP 05.png|DSP | + | 14 IBUS-App DSP 05.png|Set DSP source |
</gallery> | </gallery> | ||
| − | ''' | + | '''equaliser:'''<br /> |
| − | * | + | * set of '''source''' |
| − | ** "''' | + | ** "'''radio'''" - regular input |
| − | ** "'''CD | + | ** "'''CD changer'''" - use of the COAX input (note: ONLY the DSP volume control applies here! ==> use fixed radio volume!) |
| − | * | + | * Change the DSP/radio level with the volume slider (the 'fixed' volume depending on the operating mode set) |
| − | * | + | * Change the equaliser with the 80Hz - 12kHz sliders |
| − | * | + | * Call up and save predefined profiles with 'Memory' |
<br /> | <br /> | ||
| − | ''' | + | '''Room/Hall:'''<br /> |
| − | * | + | * Change the room and hall function using the respective slider. |
<br /> | <br /> | ||
| − | ''' | + | '''sound:'''<br /> |
| − | * | + | * Change balance, fader, treble and bass using the slider |
| − | * | + | * Set to neutral using the 'Reset button' |
<br /><br /><br /> | <br /><br /><br /> | ||
| − | == BC | + | == BC screen== |
| − | + | Depending on the vehicle and equipment the BC screen displays some values from the instrument cluster, light module and - if applicable - from the app.[https://xtrons.ibus-app.de/index.php?title=DeepOBD_-_Adapter_und_App_einrichten '''DeepOBD'''].<br /> | |
| − | + | The size of the vehicle icon is adjusted depending on the text size and number of values. The exception is the 'widescreen' layout where the size of the icon is increased by one level when you double-tap on the icon.<br /> | |
| − | + | On the vehicle symbol are shown: | |
| − | * | + | * open doors, flaps, sunroof and windows (if possible) |
| − | * | + | * active lights (with the exception of the brake lights) |
| − | * | + | * interior temperature (for E46/E83 - all others require [https://xtrons.ibus-app.de/index.php?title=DeepOBD_-_Adapter_und_App_einrichten '''DeepOBD''']) |
| − | + | Fields can be moved by tapping on the name of the display and dragging the field to the desired location and releasing it there.<br /> | |
| − | + | Fields can be removed by tapping on the name of the display and dragging it to the rubbish bin that appears at the bottom and releasing it there.<br /> | |
| − | + | You can insert new fields or perform a reset by tapping on the name of any display - dragging it to the plus sign that appears below and releasing it there. A dialogue box will then appear with all the fields that can be inserted and the reset function.<br /> | |
<gallery mode="packed-hover"> | <gallery mode="packed-hover"> | ||
00_IBUS-App_Start_HighBC.png|HighBC | 00_IBUS-App_Start_HighBC.png|HighBC | ||
| − | 00 IBUS-App Start HighBC move.png| | + | 00 IBUS-App Start HighBC move.png|customise the layout of fields on the BC screen |
| − | 00 IBUS-App Start Monitor00.png| | + | 00 IBUS-App Start Monitor00.png|details Average consumptionh |
| − | 00 IBUS-App Start Monitor02.png| | + | 00 IBUS-App Start Monitor02.png|consumption monitor |
| − | 00 IBUS-App Start Monitor01.png| | + | 00 IBUS-App Start Monitor01.png|settings for consumption monitor |
</gallery> | </gallery> | ||
<br /> | <br /> | ||
| − | ''' | + | '''In addition some fields have multiple functions:''' |
| − | * ''' | + | * '''Range:''' |
| − | ** | + | ** For vehicles with LowBC range cannot be displayed via I-BUS. A calculation based on fuel level (if shown) and distance travelled can be activated in the on-board computer settings. |
| − | * ''' | + | * '''Consumption 1 and 2''': |
| − | ** | + | ** Tap on the name to open the information on the respective consumption. |
| − | ** | + | ** Tap on the unit to switch between consumption value and calculated CO<sub>2</sub> emissions based on total mileage, fuel type and consumption value. |
| − | ** | + | ** Tapping on the numerical value resets the consumption (except when MID emulation is necessary). |
| − | ** | + | ** For vehicles with LowBC consumption cannot be displayed via I-BUS. A calculation based on tannin content (if shown) and distance travelled can be activated in the on-board computer settings. |
| − | * ''' | + | * '''Average speed''': |
| − | ** | + | ** Tap on the name to open the average speed information |
| − | ** | + | ** Tap on the numerical value to reset the average speed (except when MID emulation is necessary) |
| − | * ''' | + | * '''Mileage''': |
| − | ** | + | ** Tap on the name to switch between total mileage and a separate trip meter |
| − | ** | + | ** Tapping on the numerical value resets the trip meter. |
| − | ** | + | ** Tapping on the total mileage unit switches between total mileage and calculated CO<sub>2</sub> emissions based on total mileage, fuel type and consumption value. Tapping on the numerical value then switches between the value for consumption 1 or 2. |
| − | * ''' | + | * '''Engine/Boost Pressure/Transmission''' |
| − | ** | + | ** Tap the name to switch between engine temperature (hot/cold), boost pressure (diesel engines only and in conjunction with [https://xtrons.ibus-app.de/index.php?title=DeepOBD_-_Adapter_und_App_einrichten DeepOBD] and appropriate configuration) and the current gear from the gearbox and the gearbox oil temperature (only in conjunction with [https://xtrons.ibus-app.de/index.php?title=DeepOBD_-_Adapter_und_App_einrichten DeepOBD] and appropriate configuration) |
| − | * ''' | + | * '''Fuel level''' |
| − | ** | + | ** Tapping on the value adjusts the display to the maximum (offset to the maximum value set in the on-board computer settings is set), reset by tapping and holding on the value |
| − | ** | + | ** For vehicles with older combination instruments the fuel level cannot be communicated via the I-BUS. In this case we attempt a reverse calculation based on consumption and range (only for High BC). There is also the option of determining the tank capacity via [https://xtrons.ibus-app.de/index.php?title=DeepOBD_-_Adapter_und_App_einrichten DeepOBD]. |
| − | * ''' | + | * '''Oil temperature/oil level''' |
| − | ** | + | ** Tapping on the name switches between oil temperature and oil level (provided that TÖNS is intact - for E46, E83, etc., only in conjunction with [https://xtrons.ibus-app.de/index.php?title=DeepOBD_-_Adapter_und_App_einrichten DeepOBD] and the appropriate configuration) |
| − | ** | + | ** Oil level can be adjusted in the vehicle information to mid (short tap) or max (long tap) |
| − | ** | + | ** If an 'eKombi' module is in use (e.g. in the E46/E83 to display the oil temperature): Display from the eKombi setup after clicking on the oil temperature value |
| − | * ''' | + | * '''Vehicle image''' |
| − | ** | + | ** double-tap on the image to start an animation of the image - with the 'BC High Wide' layout the vehicle returns in a different size plus do a set-able action in "on-board computer" settings |
| − | ** | + | ** long tap on the image opens e.g. sport mode (function may be changed) |
| − | ** | + | ** change the vehicle image in the PDC settings at 'PDC image' |
<br /><br /><br /> | <br /><br /><br /> | ||
| Zeile 850: | Zeile 857: | ||
<br /> | <br /> | ||
<gallery mode="packed-hover"> | <gallery mode="packed-hover"> | ||
| − | 00_IBUS-App_Control.png| | + | 00_IBUS-App_Control.png|Control home page |
| − | 9_IBUS-App_Ansteuern1.png| | + | 9_IBUS-App_Ansteuern1.png|Time setting for auxiliary heating/ventilation |
| − | 00 IBUS-App Control MID.png|MID | + | 00 IBUS-App Control MID.png|MID start button |
| − | 00_IBUS-App_Control_MID_08.png| | + | 00_IBUS-App_Control_MID_08.png|Switch to 'MID emulation active' (if MID was previously installed!) |
| − | 00_IBUS-App_Control_MID_01.png| | + | 00_IBUS-App_Control_MID_01.png|MID Control start pagel |
00_IBUS-App_Control_MID_02.png|MID - Clock | 00_IBUS-App_Control_MID_02.png|MID - Clock | ||
| − | 00_IBUS-App_Control_MID_03.png|MID - | + | 00_IBUS-App_Control_MID_03.png|MID - time 1 and 2 |
| − | 00_IBUS-App_Control_MID_05.png|MID - | + | 00_IBUS-App_Control_MID_05.png|MID - set time 1 |
| − | 00_IBUS-App_Control_MID_06.png| | + | 00_IBUS-App_Control_MID_06.png|start page BC - average speed |
| − | 00_IBUS-App_Control_MID_07.png| | + | 00_IBUS-App_Control_MID_07.png|start page BC - consumption |
| − | 00 IBUS-App CD-Wechlser.png| | + | 00 IBUS-App CD-Wechlser.png|control of CD changer |
</gallery><br /> | </gallery><br /> | ||
| − | ''' | + | '''functions:'''<br /> |
| − | * | + | * Setting the start times for the auxiliary heating/ventilation system and direct start for both (provided that the auxiliary heating system is available, intact and set to active) |
| − | * | + | * Opening the old ‘MID menu’ (if ‘Emulate MID queries’ has been activated in the [[App_Settings_v2#On-board computer functions|On-board computer settings]]) |
| − | ** | + | ** Tap ‘Clock’ twice on the MID screen to access the menu for the auxiliary heating system |
| − | ** | + | ** Display of BC values and reset of consumption and average speed if MID was previously installed. |
| − | * | + | * Folding and unfolding the mirrors (if function available) |
| − | * | + | * Setting a limit (requires IKE High BC). |
| − | * [https://wiki.ibus-app.de/index.php?title=Einbindung_des_Original_BMW_CD-Wechslers | + | * [https://wiki.ibus-app.de/index.php?title=Einbindung_des_Original_BMW_CD-Wechslers Integration of the original CD changer] |
<br /><br /><br /> | <br /><br /><br /> | ||
| − | == | + | == sport mode == |
<gallery mode="packed-hover"> | <gallery mode="packed-hover"> | ||
| − | 14 IBUS-App Sportmode 00.png|Start | + | 14 IBUS-App Sportmode 00.png|Start Sport mode by long-pressing the car icon |
| − | 14 IBUS-App Sportmode 01.png| | + | 14 IBUS-App Sportmode 01.png|Sport mode – Layout 1 with maximum values, stopwatch and trailing indicators |
| − | 14 IBUS-App Sportmode 02.png| | + | 14 IBUS-App Sportmode 02.png|Sport mode – Layout 2 |
| − | 14 IBUS-App Sportmode 03.png| | + | 14 IBUS-App Sportmode 03.png|Sport mode – Layout 3 |
| − | 14 IBUS-App Sportmode 04.png| | + | 14 IBUS-App Sportmode 04.png|Setting for start/stop speed for stopwatch, display of last times |
| − | 14 IBUS-App Sportmode 05.png| | + | 14 IBUS-App Sportmode 05.png|Sport mode – Settings |
| − | 14 IBUS-App Sportmode 08.png| | + | 14 IBUS-App Sportmode 08.png|Sport mode – settings: number of markers in the 'instrument' |
| − | 14 IBUS-App Sportmode 09.png| | + | 14 IBUS-App Sportmode 09.png|Sport mode – settings: pointer thickness |
| − | 14 IBUS-App Sportmode 10.png| | + | 14 IBUS-App Sportmode 10.png|Sport mode – settings: speed unit |
| − | 14 IBUS-App Sportmode 11.png| | + | 14 IBUS-App Sportmode 11.png|Sport mode - Settings: Maximum speed |
| − | 14 IBUS-App Sportmode 12.png| | + | 14 IBUS-App Sportmode 12.png|Sport mode - Settings: Temperature unit |
| − | 14 IBUS-App Sportmode 13.png| | + | 14 IBUS-App Sportmode 13.png|Sport mode - Settings: Max. temperature |
| − | 14 IBUS-App Sportmode 14.png| | + | 14 IBUS-App Sportmode 14.png|Sport mode - Settings: Max. power |
| − | 14 IBUS-App Sportmode 15.png| | + | 14 IBUS-App Sportmode 15.png|Sport mode - Settings: Max. torque |
| − | 14 IBUS-App Sportmode 16.png| | + | 14 IBUS-App Sportmode 16.png|Sport mode - Settings: Max. engine speed |
</gallery><br /><br /> | </gallery><br /><br /> | ||
| − | <big>''' | + | <big>'''Long-pressing the car icon on the BC screen or the entry in the left-hand menu opens Sport mode.'''</big><br /> |
| − | <small>( | + | <small>(provided that it is set to 'long press on vehicle icon' in the on-board computer settings.)</small><br /> |
<br /> | <br /> | ||
| − | ''' | + | '''functions:''' |
| − | * | + | * Initialisation at start (full pointer deflection) |
| − | * | + | * Display of selected values as 'instrument panel' |
| − | * | + | * Stopwatch for freely adjustable start and target speed |
| − | * | + | * Display of last times |
| − | * | + | * Fixed displays (non-sliding) |
| − | * | + | * Drag pointer for maximum value (automatic reset if no higher value is reached within 5 seconds)<br /><br /> |
| − | ''' | + | '''usage:''' |
| − | '''* | + | '''* Long press on the car icon on the BC screen opens Sport mode.''' |
| − | * | + | * Long press on one of the displays switches to the next view |
| − | * | + | * Short press on one of the displays opens the setup for the sport mode |
| − | * | + | * Back button or long press on the logo exits the sport mode |
| − | * | + | * Long press on the numerical value of the maximum values (view 1) resets the values<br /><br /> |
| − | + | The values for sports mode correspond to those of the BC screen.<br /> | |
| − | + | The images show screenshots of a BMW E39 530d with [https://xtrons.ibus-app.de/index.php?title=DeepOBD_-_Adapter_und_App_einrichten DeepOBD] which is why it is possible to display the boost pressure and the higher resolution of the values for speed and torque. Without [https://xtrons.ibus-app.de/index.php?title=DeepOBD_-_Adapter_und_App_einrichten DeepOBD] or in the case of a petrol engine NO boost pressure is displayed. | |
<br /><br /> | <br /><br /> | ||
| − | <sup>10</sup> | + | <sup>10</sup>The time measurement itself is very accurate. However the speed is only updated by the speedometer every 2 seconds - via GPS about every second. Accordingly this is a gimmick but not a measuring instrument.<br /><br /><br /> |
| − | <br /><br /><br /> | ||
| − | == EHC - | + | == EHC - leveling control == |
| − | <font color="red"><big>''' | + | <font color="red"><big>'''NOTE: This experimental feature should only be used if:'''</big></font> |
| − | * <big>''' | + | * <big>'''the buffers on the rear axle (see picture below) are intact in case of an ‘emergency drive’ with the suspension completely lowered, and'''</big> |
| − | * <big>''' | + | * <big>'''dthe start values for the offsets are set by the app ‘[https://xtrons.ibus-app.de/index.php?title=DeepOBD_-_Adapter_und_App_einrichten DeepOBD]’, and'''</big> |
| − | * <big>''' | + | * <big>''' the BMW software is available to fix any errors and the handling is clear.'''</big><br /><br /> |
| − | <font color="red"><big>''' | + | <font color="red"><big>'''We disclaim any liability for incorrect operation by the user or the consequences of using this part of our app!'''</big></font><br /> |
| − | <font color="red"><big>''' | + | <font color="red"><big>'''There is no ‘reset’ in the case of errors! The height change rarely corresponds to the real value (even with BMW software!) and not all values are converted.'''</big></font><br /><br /> |
| − | <font color="red"><big><big><big>''' | + | <font color="red"><big><big><big>''''''</big></big></big></font><br /><br /> |
| − | + | The menu can only be accessed by setting it to "long" or "double" tapping on the vehicle symbol in the on-board computer settings. The menu appears as follows: | |
<br /><br /> | <br /><br /> | ||
<gallery mode="packed-hover"> | <gallery mode="packed-hover"> | ||
| − | EHC1.jpg| | + | EHC1 en.jpg|Warning for use of levelling control |
| − | EHC.jpg| | + | EHC.jpg|menu leveling control |
| − | EHC2.jpg| | + | EHC2.jpg|menu leveling control - note: "car in motion" |
| − | E39 touring Puffer Hinterachse.jpg| | + | E39 touring Puffer Hinterachse.jpg|buffer rear axle |
</gallery> | </gallery> | ||
| − | + | To the left and right of the vehicle image, you can see the start value loaded and entered from the app [https://xtrons.ibus-app.de/index.php?title=DeepOBD_-_Adapter_und_App_einrichten DeepOBD] (with the appropriate config from the wiki). If there is a 0 here, we strongly recommend NOT to use this feature!!!<br /> | |
| − | # | + | # Otherwise, enter the desired change in millimetres in the centre and then tap "raise" or "lower" to the left, right or axis.<br /> |
| − | # | + | # The function is only possible when stationary (speed "0 km/h") AND when the engine is running! Corresponding warning messages are displayed and the function is disabled.<br /> |
| − | # | + | # It is possible that NOTHING moves adhoc on the suspension and that the change only takes effect after a few metres of driving.<br /> |
| − | # | + | # In general, the function is currently only available for the BMW E39 touring and only applies to the factory-fitted air suspension on the rear axle. |
<br /><br /> | <br /><br /> | ||
Aktuelle Version vom 4. März 2026, 08:30 Uhr
up on app version: 2.2.1.4
Inhaltsverzeichnis
- 1 Home screen
- 2 function overview
- 3 app info / wiki link etc
- 4 access authorisation for Resler module / Resler interface
- 5 activating the I-BUS App licence
- 6 settings (overview)
- 7 navigation menu
- 8 BC screen
- 9 Control
- 10 sport mode
- 11 EHC - leveling control
Home screen

LowBC
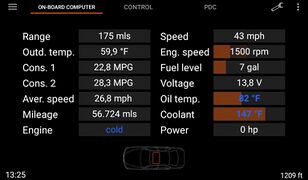
HighBC


The data provided by the IKE (speedometer) differs depending on the model. Here is an example for the BMW E39.
With a small on-board computer (Low BC), the consumption, range and average speed values cannot be displayed on the app.
Habe ich High oder Low BC?
function overview

| pos. | name | function | actions |
|---|---|---|---|
| 1 | left menu | contains: BC screen, sport mode, coding, car infos, light control, DSP, update, firmware update, settings, expert mode, activation, about | open the menu by tapping on the icon or dragging the left side to the centre. |
| 2 | app pages | display of on-board computer values, control PDC and OBD screen | open by tapping on the respective name |
| 3 | app settings | contains the app settings (incl. Resler module settings) | open by tapping on the icon |
| 4 | menu "activate" and "about" | contains the menu for activating the app license and the "about the app" menu with information about the licence, app and firmware version etc. | open by tapping on the icon |
| 5 | Range | shows the BC value of the current remaining range note: Fehlende BC-Werte |
- |
| 6 | ambient temperature | shows the BC value of the current ambient temperature | - |
| 7 | consumption 1 | shows the on-board computer value of current av. consumption 1, consumption 1 calculated as "CO2" and consumption monitor 1 |
tap on the name: opens consumption monitor long tap on the value (or "reset button" if activated in settings): reset consumption 1 |
| 8 | consumption 2 | shows the on-board computer value of current av. consumption 2, consumption 2 calculated as "CO2" and consumption monitor 2 |
tap on the name: opens consumption monitor long tap on the value (or "reset button" if activated in settings): reset consumption 2 |
| 9 | average speed | shows the BC value of the current average speed |
long tap on the value (or "reset button" if activated in settings): reset average speed |
| 10 | mileage | shows the BC value of the mileage, conversion of mileage into CO2 quantity oder "I-BUS App own" trip odometer | tap on the name: Switch between mileage, trip odometer and CO2 total long tap on the value: (only trip odometer) reset odometer |
| 11 | engine | shows the calculated equivalent state of the engine (cold/warm), or values via DeepOBD (boost pressure or current gear + transmission temperature) | tap on the name: Change between engine, boost pressure and gearbox |
| 12 | car icon | shows the vehicle image selected in the PDC menu with information on open flaps/doors, active lights and interior temperature (only for E46/E83 also without DeepOBD) depending on the layout selected, the icon is located in the centre (High BC wide) or at the bottom (High BC) |
long tap on the icon: depending on the set function double tap on the icon: depending on the set function |
| 13 | speed | shows the on-board computer value of the current speed (regularly every 2s, with DeepOBD significantly more accurate and faster) | - |
| 14 | engine speed | shows the on-board computer value of the current engine speed (regularly in steps of 100 UPMs every 2s, with DeepOBD significantly more accurate and faster) | - |
| 15 | fuel level | shows the on-board computer value of current fuel level |
tap on the value: adjusts the display to the maximum (offset to the maximum value set in the on-board computer settings is set) long tap on the value: resets the offset |
| 16 | voltage | shows the on-board computer value of the current vehicle voltage (from the light module or from DeepOBD) | - |
| 17 | oil temperature | shows the value of oil temperature or oil level | tap on the name: switch between temperature and level note: Accuracy of engine and oil temperature and oil level and TÖNS and oil temperature |
| 18 | coolant temperature | shows the on-board computer value of the current coolant temperature | - |
| 19 | power / torque | shows the calculated value of the power, torque or lambda (only for diesel and via DeepOBD) |
tap on the name: switching between power, torque and lambda |
| 20 | title bar | shows information on the currently playing track/radio station (information depends on the app, position at the bottom or top depending on the setting) |
forward/back button: (if enabled) title/station forward/back |
| 21 | DSP | send start signal to the OEM DSP amplifier or opens the DSP menu | tap on the button: send start signal to DSP amp long tap on the button: opens DSP menu |
| 22 | date/time | shows date/time according to the set mode | - |
| 23 | CPU info | shows CPU usage and temperature (if activated and supported by the radio) | - |
| 24 | GPS info | shows current address (only with an active internet connection), altitude, GPS speed and direction | - |
app info / wiki link etc

app info

use the three dots in the upper right corner to enter the app info menu "About".
here you will find informations/links:
- app version
- firmware version of the Resler module
- VIN read out (for the licence)
- licence status
- Wiki
- contact
- changelogs: Englisch
- website
- Send a log file for trouble shooting
- icons
- donate button
note: the versions, VIN and licence status are only read once when the app is started. The values are not queried again while the app is running!
access authorisation for Resler module / Resler interface

grant USB access authorisation

The Resler module / Resler interface requires USB authorisation for communication via the vehicle bus.
This message appears as soon as the app has recognised the module/interface. If you have missed this, either reconnect the interface or restart the app completely.
The checkbox must be checked so that the app can grant authorisation automatically.
With some Android versions, this message appears every time the radio is restarted, but not if the radio only wakes up from standby.
activating the I-BUS App licence

activate (top right or in the pull menu on the left)

vehicle not yet unlocked

vehicle unlocked


To activate the I-Bus app, a app licence must have been purchased and the VIN must be activated (stored online).
In addition, a stable connection to the Resler module/Resler interface and the Internet must be guaranteed.
To get to the activation screen:
- either click on the three dots in the app toolbar, or
- open the menu on the left by tapping on the left three lines Open and scroll down and click on "Activate".
once on the screen, the message appears with the current status "Vehicle not yet unlocked".
click on the Activate button to start the VIN online check.
if the Resler module is also used, its serial number is also checked and the Resler module is activated.
a message then appears. there are now five options:
- 1. '"The app has no access to the interface. Please check the USB connection in general app settings. .." → Please check whether the USB connection in the "general settings" in I-BUS app was active.
- 2. '"The vehicle identification number of your vehicle could not be read. Please check the connection of the individual contacts of the interface. .." → Check the connection of the individual contacts of the interface! → Einbauanleitung für Resler Modul und Resler Interface
- 3. "No internet connection!" → There is no or insufficient Internet connection.
- 4. "Activation failed!" → The VIN is not yet stored online. Buy an app licence and wait a maximum of 24 hours.
- 5. "Activation successful!" → The status changes to "vehicle unlocked". The app functions can now be used to their full extent.
settings (overview)

setup menu

search function in the I-BUS app settings


The settings are divided into different categories.
- general app settings
- Resler module settings
- on-board computer
- IKE settings
- light settings
- PDC und reverse
- GPS data
- central lock
- coming/leaving home
- DSP
- other settings
NEW We have integrated a search function within the app settings so that you can search for functions without having to scroll through the menus.
general app settings

general app settings

USB interface: selection with connection

select language

fit font size

themes

start delay

DAB+ broadcasts

change car series
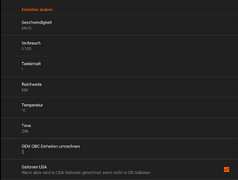
change units

change units

import/export

import/export storage location


options:
- disconnect USB connection (only for a short time - if the interface/module is found on the USB, the connection is re-established when the BC screen is opened) or connect it
- Selection of the USB interface ("R.Resler IBUS Interface V6b" or Resler module)
- up on v2.2.0.3, the connection (port) is also displayed in order to be able to use a TPMS (tyre pressure display) in addition to the module/interface, for example. It is recommended to connect the Resler interface/resler module to the green USB and the TPMS to the yellow USB.
- for recommended radios usually applies:
- red and green USB: port 1
- Yellow USB: port 3
- ignoring the USB port selection (for radios with problems when defining the port or changing port names)
- language and font size of the app (without changing the system language). Current languages:
- Bulgarian
- German
- English
- French
- Greek
- Italian
- Croatian
- Lithuanian
- Dutch
- Norwegian
- Polish
- Portuguese
- Romanian
- Russian
- Slovenian
- Spanish
- Traditional Chinese
- Czech
- Turkish
- Hungarian
- selection of defined themes
- full screen
- automatic start after reboot
- start delay
- app update check when starting the app
- automatic app start via USB (app starts when interface/module is recognised on USB)
- pop-up music broadcasts
- DAB+ broadcasts
- change series, units + convert OEM values to other units
- import/export of settings
- delete app data
Resler module settings
link to Resler Module Settings

overview Resler module settings

on-board computer functions
OBC functions menu
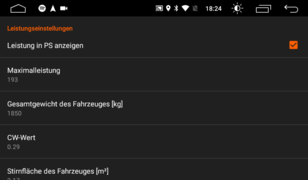
power calculation settings
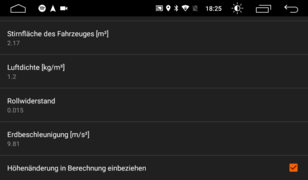
power calculation settings
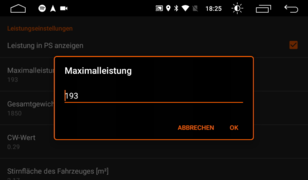
maximum power (for bar)
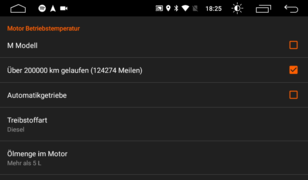
settings engine temperature
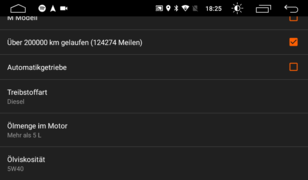
settings engine temperature
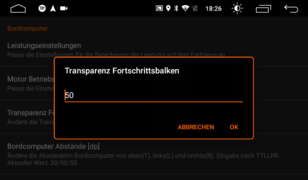
Transparency progress bar
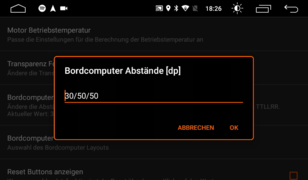
OBC spacings
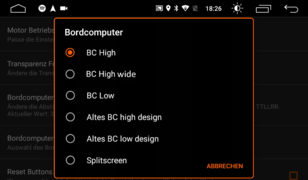
OBC choice
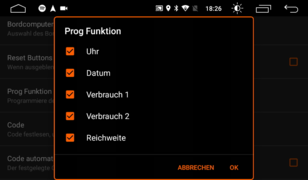
OBC programme functions for display in IKE (cluster)
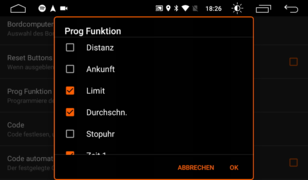
OBC programme functions for display in IKE (cluster)
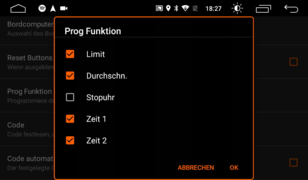
OBC programme functions for display in IKE (cluster)

OBC programme functions for display in IKE (cluster)
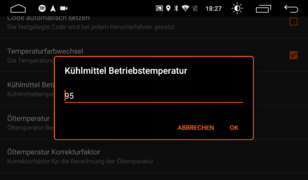
target coolant

source for oil temperature
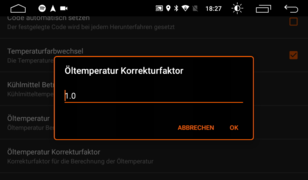
correction factor for oil temperature
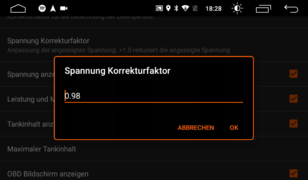
correction factor for voltage
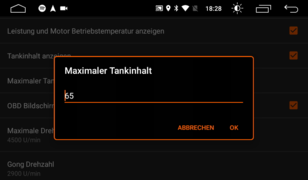
max. fuel tank capacity

position for title informations

font size for small elements

display format for the time and date
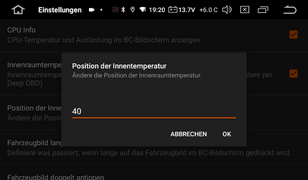
interior temperature position - shift down by x pixels (BC High wide) or x pixels to the right (BC High)
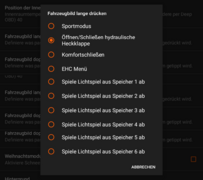
function for "long tap on car icon"

function for "double tap on car icon"

"background image" menu
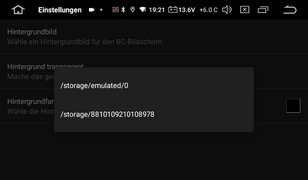
"background image" menu - select storage
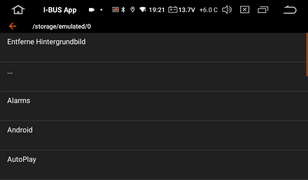
"background image" menu - reset/remove background image or select image file folder

"background image" menu - reset/remove background image or select image file

"background image" menu - set the transparency of the background image

"background image" menu - customise background colour

"background image" menu - customise background colour => 100% transparent
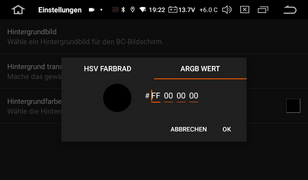
"background image" menu - customise background colour as hexacode

"background image" menu - example with background image

example background image for 7" display: 1024x540 pixels


The following options are available in the on-board computer (OBC) settings:
- enter basic data for power, torque and temperature calculation1
- transparency of the progress bar (0 = full colour, 100 = invisible)
- specify top, bottom, left and right distances for on-board computer
- set whether you have a large or small BC (see above) or which layout you want
- LowBC calculations (calculates average consumption from distance travelled and tank capacity)
- show/hide reset buttons [without reset buttons, the value is reset to the numerical value(!!!) via tap and hold].
- changing the Prog functions of the OBC
- specify and automatically set engine start disable code
- colour change for coolant and oil temperature (cold - blue, white - at operating temperature, red - hot)
- display of the oil temperature and definition of the calculation (LCM 3 or 4, DeepOBD, eKombi,.. )2
- correction factors for oil temperature and voltage display
- show/hide voltage, power, engine temperature, fuel level and OBD screen (only required to display data from the app "Deep OBD" to receive and display values)
- specification of the maximum speed and the chime speed when the motor is cold, plus (de)activation of the chime
- emulate MID queries (MID emulation) - possibly necessary if only OEM radio (no sat nav) was installed before the Android head unit. OPTIONALLY you can recode the "Anzeigegerät" in the High BC speedometer to "bordmonitor".
- Function for "Long press on vehicle image" (at OBC and PDC screen) [among other things, the hydraulic tailgate can be opened and closed here3]
- display of CPU temperature and utilisation (if supported by the radio)
- move the interior temperature display downwards (for "BC High Wide" on-board computer layout) or to the right (for "BC High" on-board computer layout)
- set functions for long and double tap on car icon
- activate Christmas mode (it "snows" in the app if you have set a light sequence (1-6) for "double tap" - in addition to the light sequence, and also in the "About" menu)
- customise the background of the "on-board computer screen"
- set a background image and adjust its transparency
- reset: select background image ==> select storage location and then select the "remove background image" item
- adjust the background colour (either with transparency behind the image or without the image). The colour can be selected in the colour wheel, as well as the saturation, brightness and transparency. Optionally, you can set the ARGB value directly.
- If the "grey fields" around the values are missing on the on-board computer image ==> set the transparency of the colour to 100% (right slider all the way up) - only works WITHOUT the background image set!
3 When opening/closing the tailgate from the passenger compartment, the operator must ensure that there is no risk of property damage/personal injury! The operators of the app accept no liability for this!
accuracy of power and torque calculation
1 The power/torque calculation is based on the speed determined by the GPS from which the acceleration is calculated from two values. GPS positioning has an accuracy of approx. 2-3 metres and is only updated approx. every second. A "wheel power" is calculated using parameters such as vehicle mass, frontal surface, air resistance, etc., i.e. the displayed value will generally reach a maximum of ~70% of the engine power (we cannot record the drag power).
To calculate the torque we use the proportionality to the speed and calculate the torque from the (wheel) power determined above. Since without DeepOBD we only get a new speed from the tacho every ~1.5s, and only in steps of 100 rpms, the value is correspondingly "accurate".
In short: these values are to be seen more as a toy and have no actual relation to a measurement on a dynamometer.
accuracy of engine and oil temperature plus oil level
The engine temperature is also a calculated value. The specified oil quantity and other parameters are used to calculate when the engine oil should be at operating temperature. Only when this is reached is the gong warning (if active) switched off completely if the specified engine speed is exceeded. If the coolant temperature is no longer displayed as cold, the speed of the gong warning is already increased by 1000 rpm.
2The oil temperature and the engine oil level are determined from the values of the TÖNS (thermal oil level sensor). This function is not available for BMW E46 and E83 (without additional hardware) as the sensor is not connected to the LSZ (light check module). If no value or an implausible value is displayed, it can be assumed that the TÖNS is defective. A corresponding error will be stored in the LCM/LSZ. If a so-called "eKombi module" is installed, e.g. in the E46, the value can be displayed via this, or also via the app "DeepOBD".
Note: The value is NOT' determined from a real oil temperature sensor that may be present and does not correlate 100% with values from such a sensor. This also applies to the oil level: the value is more informative than qualitative. A "10" does not mean that "10% of the level between MIN and MAX" has been measured. If in doubt, please always check the oil level on the dipstick!
Note: The oil level can be adjusted to "centre" (short click) or "MAX" (long click) in the "vehicle information" menu.
IKE settings
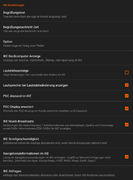
IKE menu

welcome message

display duration for welcome message

display type for welcome message

source oil temperatur

standard OBC value to be displayed in IKE

scroll speed IKE

IKE requests

notification access - rights query
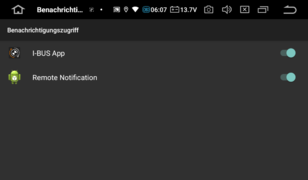
notification access


IKE functions can only be used if the High BC cluster.
- welcome message in the cluster display when starting the I-BUS app
- display duration for welcome message
- display one value in IKE display as standard (speed, coolant or oil temperature, voltage, no value)
- display of the volume in the IKE (PX3/PX5/PX6/Qualcomm devices only)
- display of the PDC distances in the IKE (when PDC is active)
- display of music broadcasts in IKE (only from certain apps)
- set IKE scroll speed
- odometer reading querys (deactivating the odometer reading query is only relevant for older estates before 7/98, as these may no longer display active lights).
- select/deselect individual IKE queries
- navigation informations in IKE display4
4 The information display only works for speedometers with High BC and in the E46 from KMB_E46.C03 (with suitable coding - only the distance to the next junction). Information can only be displayed if notification access is activated (Android setup → Apps → Special access → Notification access → Activate for "I-BUS App").
The following apps can display information: Google Maps, Sygic GPS, Here WeGo and Magic Earth (Magic Earth only sends information when it is running in the background!)
light functions

light functions menu - light control active via app

light functions menu - light control via Resler module active (if available)

number of tip flashes

max. speed for cornering light

follow-up time for cornering light

daytime running light options

daytime running light start

Motorway lights


options:
- switching whether I-BUS app or Resler module should implement the light functions
- number of tip flashes (0-7x)
- speed limit for cornering light (activation of the respective fog light when indicator is active)
- follow-up time of the cornering light
- Options for daytime running light (parking light front and rear, fog lights, ambient light)
- start daytime running light with ignition level 1 or 2
- cornering light for tip flashing
- cornering light always active (only on with active parking or dipped beam as standard)
Note:' The cornering light is activated parallel to the indicator not via the steering wheel position (no access to the sensor!).
PDC and reverse gear

PDC menu

volume during active reverse gear

PDC picture

time kerb control


options:
- hide front PDC (if not available)
- volume reduction when reverse gear is active (only PX3/PX5/PX6/Qualcom devices, useful if no reversing camera is used)
- PDC screen change when PDC is active
- PDC screen change: I-BUS app is active in the foreground, PDC switches on → Switch to the PDC screen
- PDC screen change 2: for the option above, immediately switches back to BC screen when reverse gear is ntlonger engaged not only when the PDC is off (for vehicles WITHOUT PDC at the front)
- PDC change to the foreground: I-BUS app is NOT active in the foreground, PDC switches on → Switch to the PDC screen of the I-BUS app (and back to the previous app after switching off see selection above)
- PDC screen pop-up: I-BUS app is NOT active in the foreground, PDC switches on → an image of the vehicle appears, adjustable in size and position, with the PDC distances (only when an obstacle appears!!!) above the current app (incl. reversing camera) until switch-off criterion (see above)
- change size: double-tap on the icon
- change position: tap and hold the icon for 2 seconds, then move it
- reverse change already when reverse gear is no longer active
- PDC image of the vehicle
- automatic kerb control plus optional driver's mirror and adjustable time (determines how far the mirror lowers)
- activation of the recirculation function when reverse gear is active (prevents the intake of own exhaust gases)
GPS data

displayable GPS data

display of GPS determined:
- address (Internet connection required)
- altitude
- speed
- compass
All GPS data can be displayed simultaneously.
central locking system

central locking system menu

automatic locking up on xx km/h

telegram for central locking

comfort closing up on xx km/h

telegram for closing sunroof


options:
- show/hide the status of the central lock
- automatic locking up on an adjustable speed
- automatic unlocking when the ignition is switched off or the handbrake is applied (only with High BC)
- change the telegram for central lock and/or the sunroof (if necessary - in case of malfunction, please test another telegram!)
- constant display of the vehicle silhouette even when the doors/flaps are closed
- open bonnet display (only with anti-theft system from factory)
- (un)folding the mirrors (if available)5
- comfort closing of the windows/sliding roof when the ignition is switched off6
- comfort closing of the windows/sliding roof when a defined speed is exceeded6
- mirroring the doors (for vehicles with right-hand drive)
- open door volume (sets current volume to set "reverse volume" in "PDC and reverse" menu - when any doors is opened and goes back to old volume when door was closed again)
5Activation of the mirrors is automatically paused if they are activated too often in quick succession.
6The power windows and sunroof are controlled via a "diagnostic command". NO interruption is possible during this activation, i.e. the window/roof are first closed completely. A new activation is only possible a few seconds after the movement has been completed.
Attention: DANGER OF INJURY: The "pinch protection" is NOT active during comfort closing, i.e. the window and/or roof close and do NOT stop if something gets stuck in between. Attention: DANGER OF INJURY
Coming-/Leaving Home
This setting is a remnant of the I-BUS app before the Resler module! Using the Resler module makes this option obsolete. Please use the settings in the Resler module!
Resler Modul => coming/leaving home
'

coming/leaving home menu

time setting for coming/leaving home

select lighting control memory number

select consumer shutdown telegram

select coming home start signal


To use the Coming/Leaving Home functions, the radio's power supply must be switched to consumer shutdown (CS)! → reconnecting radio to consumer shutdown
options:
- Activation of consumer shutdown, coming/leaving home
- Time slots for coming/leaving home
- Light function memory number
- Modification of the CS telegram and the coming home start signal [Both must be set to suit the vehicle and according to the desired switch-on time.!!!!]
note:
Coming/Leaving Home via consumer shutdown is not a core function of the app, but rather an experimental attempt to implement this function. 100% functionality cannot be guaranteed.
Setting the consumer shutdown
In order for the consumer switch-off to function correctly, the radio must be reconnected accordingly and this function must be set correctly. Unfortunately, as this cannot be done automatically, the appropriate setting must be tried out.
Start by setting the Radio Consumer Shutdown to active.

Next up is the CS telegram: The telegram must match the series - there may be several telegrams for the model.

Then set the appropriate start signal. Please ensure that the desired signal is available.
- immobiliser (EWS)
- lock (central lock)
- remote lock (wireless remote control)
- ignition off
- alarm system (arming the anti-theft alarm system)
Multiple selections are possible. Often the combination of Lock and remote Lock is sufficient.

Finally, set the start time for the morning and evening. I.e. until when the lights should still be on tomorrow and from when in the evening. If you want them to be on all the time set the morning and evening times to 12:00.
If the settings are correct the radio should switch off a few (!) seconds after the start signal and the LED on the automatic gear lever (if present) and the glove compartment light (if open!) should switch off.
When you unlock the vehicle the radio should start up again and the lights should come on.
If lighting controls are defined, the function is active (check box selected) and assigned to the coming/leaving home functions - these should start accordingly. See chapter Lichtsteuerung
DSP

DSP menu

Start delay 2. DSP star

DSP start level

DSP start – short tap on DSP icon

DSP volume levels

CD changer connection type


options:
- Show DSP button on BC screen
- Fixed radio volume (only DSP is changed or the radio is always assigned the same volume when changed)
- DSP restart after engine start
- Delay time for second start
- DSP start level (level set each time the app is started)
- DSP volume buttons (instead of slider)
- Adjustment of DSP volume levels
- Display of equaliser values
- Selection of CD changer connection type
note: over the years some manufacturers have managed to address the DSP in such a way that it is starts DSP amp once with an unknown set of parameters. This may cause the DSP to output sound but often at much to high volume. This is only noticed when the 'amplifier' function is set to 'no amplifier' (usually in the general factory settings or under 'CAN'). Once set this way there is no sound until the I-BUS app starts.
- Xtrons PB-/PQ-/IQ- series: factory settings => CAN => amplifier
- Xtrons IX-/PX- series: factory settings => general => amplifier
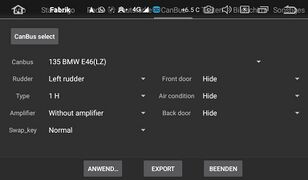
Xtrons PB-/PQ-/IQ- series: factory settings => CAN => amplifier
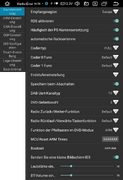
Xtrons IX-/PX- series: factory settings => general => amplifier


DSP operating modes
There are two operating modes for the DSP:
- "fixed DSP volume"
- "fixed radio volume (as original)
Since the volume can be adjusted on both the radio and the original DSP power amplifier, it makes sense to set one of them to a fixed level.
1. fixed DSP volume
This function is set 'ex works' in the app because it is easier to handle.
For this you just need to set a 'start level' for the DSP which is set in the DSP power amplifier when the app is started. The DSP remains at this 'volume' level. Only the volume of the radio changes.
Disadvantage: there is often background noise (static) and the sound quality is not as good as with a 'fixed radio volume'.
2. fixed radio volume
Up to I-Bus App v2.1.4.2, the 'fixed radio volume' does not yet work very well. Up on I-Bus App v2.2 it can be used well.
This is where the process is reversed: the volume of the radio is 'fixed' and - as with the original radio - I-BUS app only change the volume in the DSP power amplifier.
However it is advisable to make a few adjustments:
- setting the "fixed radio volume" function
- enable "DSP volume buttons"
- set the "DSP volume levels" to "2"
- enable "DSP equaliser values"
- set "DSP start level" "[recommendation: 10]"
- set "radio volume at start" "[recommendation: 20]" (Only works with MTC-based radios with PX3/PX30/PX5/PX6/Qualcomm 665! See recommended radios)
To set the radio 'default boot volume' at start-up go to the 'factory settings' of the radio:
Android-Setup => CAR => factory settings (code: 126) => other => "Boot Default Volume":

Android-Einstellung - CAR

Android-Einstellung - factory settings(code: 126)

Android-Einstellung - factory settings- "others" - "Boot default Volume"


note: With this setting only the DSP volume (also displayed) can be changed using the steering wheel buttons and the radio. However the radio volume bar CANNOT be hidden. This means that it appears jumps up one level and then back again. The DSP volume - however - changes in the desired direction.
At least with steering wheel controls you can get around this but more on that later.
other settings

other settings

2. app start

BFD lights

BFD lights

size quick start

set up quick start

Example quick start

expert mode
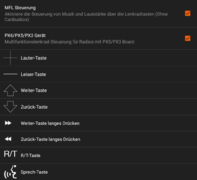
customise SWC menu

Adjust function selection for SWC


options:
- automatic setting of time and date (in BC) when the app starts
- SWC (for tablets or if no CAN BUS box is available)7
- from v2.2 onwards, the SWC buttons can also be assigned differently. Please note 7!
- auxiliary heating selection (must be set to active if an “”'I-BUS controllable'“” auxiliary heater is installed) Note! Can only control an existing, original auxiliary heater!
- CD changer: displays the ‘CD changer’ menu for integration of the original CD changer.
- mirror control: Show/hide the mirror control menu
- soft top: “'Function only in preparation”'
- display OBD screen: Displays the ‘OBD’ tab for displaying values from the DeepOBD app
- show/hide control and PDC screen
- flow control (should NOT be switched off!)
- display of expert mode in the menu (live display of BUS telegrams)
- activation of BrakeForceDisplay (BFD)8, selection of lights and their delay time
- SDVC: switch speed-dependent volume adjustment on/off
- Workshop mode: Disconnects the interface while this mode is active
- Quick start bar9 [Size: off / small / large]
- automatic app start: Select up to two apps to start automatically after launching the I-BUS app. Additionally, the delay can be
7ATTENTION: Activating this function while a CAN BUS box is connected at the same time may cause malfunctions!
note: If functions that deviate from the standard assignment (e.g. starting an app or standard Android functions) are set here, the standard function AND the newly set function will be executed when the button is pressed.
This can only be prevented by disconnecting/unplugging the brown-black cable between the CAN-BUS box and the radio! However, this means that the MFL buttons only work when the I-BUS app is running.
8BFD = Break Force Display. For this function, the speedometer in the E39 must be at least model year 09/2001 and must be coded appropriately! In addition, DSC is necessary; ACS is not sufficient. The conditions for activating the BFD are anchored in the coding and cannot be influenced by the app.
What was BFD?
9The quick start bar can be opened anywhere in the I-BUS app (except in Settings and Light Control) by swiping up from the bottom. Here you can set any shortcuts to apps that can be opened from the quick start bar. There is also the option to display the complete app list or the list of recently opened apps. To add an app tap the icon with the +. To remove an app tap and hold one of the icons.

navigation menu

navigation menu


To open the navigation menu either tap the three lines in the top left corner or swipe right from the left edge.
In this menu you can switch between the different app screens:
- BC screen
- Coding
- Vehicle information
- Light control
- DSP (if available and licence purchased)
- Check for Update
- Settings
- Activate
Coding

Home page with panic button

Control unit selection

LCM selection

LCM successfully read

Parameters using LCM as an example

Parameters using LCM as an example

Parameters using LCM as an example

Light selection for home lights

LCM successfully coded

PDC selection

LCM successfully read

Parameters using PDC as an example

Parameters using PDC as an example


The panic button resets all US coding of the lighting control unit with a single click.
procedure:
- Select a control unit (LCM/LSZ, PDC, DSP)
- Read coding data
- The message ‘Coding data successfully read’ appears
- Change the desired parameters
- Write coding data
- The message ‘Coding successfully completed’ appears
In addition once the coding data has been read it can be changed and written as often as desired.
"Reset" performs factory coding.
Note for daytime running lights E38, E39 [DRL Denmark]
In Denmark, Sweden, Norway (and Canada) it is a legal requirement to have your headlights (low beam) switched on during the day. This function is called 'daytime running lights'.
For ECE vehicles with the country specifications 'Germany', 'Austria' and 'Switzerland' the 'light check module' can now be recoded for the 'daytime running lights' function.
functions:
The light switch must be set to position 'II' (low beam active). When the ignition is switched to 'ON' the low beam and rear lights are automatically switched on. When the ignition is switched to 'OFF' all of the vehicle's exterior lights are switched off.
The daytime running light functions in the same way as the 'Denmark' version. The 'Norway' variant in which the running light is activated when the light switch is off (and the ignition is 'ON') was deliberately not chosen so that the customer can switch the function on or off as desired.
car infos

car information

service reminder

check control messages

active lights


display of:
- Vehicle type
- Language
- Units
- Last service before...
- VIN (required to activate the app)
- Current gear (only for automatic transmissions - shift levers only show N or R)
- Oil level (only with intact TÖNS = thermal oil level sensor and not for vehicles with LSZ)
note: 'oil level' is NOT a measuring instrument in meaning that the value does not reflect the exact level. The value must not fall below the minimum but that is all it tells you!
light control

Home page Lighting control

Select lights

Load light sequence

Import light sequence

Save light sequence

Export light sequence

Example light sequence


In the lighting control system, lighting sequences can be:
- created
- saved to memory locations 1-6
- written to the Resler module as CH/LH
- exported
- loaded from memory locations 1-6
- imported from the Resler module
- imported as a file
procedure:
- Click on ‘Select light’ to open a list of all available lights.
- After selecting the light, set the timer for how long these lights should be active (no selection = pause).
- Add the selected light sequence.
- Repeat steps 1-3.
notes:
- briefly tapping 'delete' removes the last light sequence
- tapping and holding deletes the entire list
- tapping on a list item plays it
- tapping and holding on a list item copies the selected lights with timer and adds them to the upper selection
- tapping on 'Play' showns the entire light sequence
- light sequences can be stored in 6 memories and reloaded and can also be exported and imported as XML files
- light sequence in memory 1 can be activated by pressing the light horn twice
- memories 2 - 6 can be assigned to Coming/Leaving Home. A sequence must be stored here for each one to be activated.
Downloading and inserting sample light sequences
At Load there is Import where you can insert sequences created on your PC or sample sequences for example.
DSP

Home page DSP / Equaliser

DSP: Room / Hall

DSP: Balance/Fader/Treble/Bass

Set DSP source


equaliser:
- set of source
- "radio" - regular input
- "CD changer" - use of the COAX input (note: ONLY the DSP volume control applies here! ==> use fixed radio volume!)
- Change the DSP/radio level with the volume slider (the 'fixed' volume depending on the operating mode set)
- Change the equaliser with the 80Hz - 12kHz sliders
- Call up and save predefined profiles with 'Memory'
Room/Hall:
- Change the room and hall function using the respective slider.
sound:
- Change balance, fader, treble and bass using the slider
- Set to neutral using the 'Reset button'
BC screen
Depending on the vehicle and equipment the BC screen displays some values from the instrument cluster, light module and - if applicable - from the app.DeepOBD.
The size of the vehicle icon is adjusted depending on the text size and number of values. The exception is the 'widescreen' layout where the size of the icon is increased by one level when you double-tap on the icon.
On the vehicle symbol are shown:
- open doors, flaps, sunroof and windows (if possible)
- active lights (with the exception of the brake lights)
- interior temperature (for E46/E83 - all others require DeepOBD)
Fields can be moved by tapping on the name of the display and dragging the field to the desired location and releasing it there.
Fields can be removed by tapping on the name of the display and dragging it to the rubbish bin that appears at the bottom and releasing it there.
You can insert new fields or perform a reset by tapping on the name of any display - dragging it to the plus sign that appears below and releasing it there. A dialogue box will then appear with all the fields that can be inserted and the reset function.

HighBC

customise the layout of fields on the BC screen
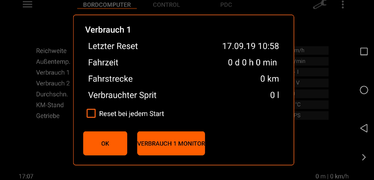
details Average consumptionh

consumption monitor

settings for consumption monitor


In addition some fields have multiple functions:
- Range:
- For vehicles with LowBC range cannot be displayed via I-BUS. A calculation based on fuel level (if shown) and distance travelled can be activated in the on-board computer settings.
- Consumption 1 and 2:
- Tap on the name to open the information on the respective consumption.
- Tap on the unit to switch between consumption value and calculated CO2 emissions based on total mileage, fuel type and consumption value.
- Tapping on the numerical value resets the consumption (except when MID emulation is necessary).
- For vehicles with LowBC consumption cannot be displayed via I-BUS. A calculation based on tannin content (if shown) and distance travelled can be activated in the on-board computer settings.
- Average speed:
- Tap on the name to open the average speed information
- Tap on the numerical value to reset the average speed (except when MID emulation is necessary)
- Mileage:
- Tap on the name to switch between total mileage and a separate trip meter
- Tapping on the numerical value resets the trip meter.
- Tapping on the total mileage unit switches between total mileage and calculated CO2 emissions based on total mileage, fuel type and consumption value. Tapping on the numerical value then switches between the value for consumption 1 or 2.
- Engine/Boost Pressure/Transmission
- Fuel level
- Tapping on the value adjusts the display to the maximum (offset to the maximum value set in the on-board computer settings is set), reset by tapping and holding on the value
- For vehicles with older combination instruments the fuel level cannot be communicated via the I-BUS. In this case we attempt a reverse calculation based on consumption and range (only for High BC). There is also the option of determining the tank capacity via DeepOBD.
- Oil temperature/oil level
- Tapping on the name switches between oil temperature and oil level (provided that TÖNS is intact - for E46, E83, etc., only in conjunction with DeepOBD and the appropriate configuration)
- Oil level can be adjusted in the vehicle information to mid (short tap) or max (long tap)
- If an 'eKombi' module is in use (e.g. in the E46/E83 to display the oil temperature): Display from the eKombi setup after clicking on the oil temperature value
- Vehicle image
- double-tap on the image to start an animation of the image - with the 'BC High Wide' layout the vehicle returns in a different size plus do a set-able action in "on-board computer" settings
- long tap on the image opens e.g. sport mode (function may be changed)
- change the vehicle image in the PDC settings at 'PDC image'
Control

Control home page

Time setting for auxiliary heating/ventilation

MID start button

Switch to 'MID emulation active' (if MID was previously installed!)

MID Control start pagel

MID - Clock

MID - time 1 and 2

MID - set time 1

start page BC - average speed

start page BC - consumption
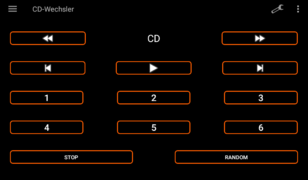
control of CD changer


functions:
- Setting the start times for the auxiliary heating/ventilation system and direct start for both (provided that the auxiliary heating system is available, intact and set to active)
- Opening the old ‘MID menu’ (if ‘Emulate MID queries’ has been activated in the On-board computer settings)
- Tap ‘Clock’ twice on the MID screen to access the menu for the auxiliary heating system
- Display of BC values and reset of consumption and average speed if MID was previously installed.
- Folding and unfolding the mirrors (if function available)
- Setting a limit (requires IKE High BC).
- Integration of the original CD changer
sport mode

Start Sport mode by long-pressing the car icon

Sport mode – Layout 1 with maximum values, stopwatch and trailing indicators

Sport mode – Layout 2

Sport mode – Layout 3

Setting for start/stop speed for stopwatch, display of last times

Sport mode – Settings

Sport mode – settings: number of markers in the 'instrument'

Sport mode – settings: pointer thickness

Sport mode – settings: speed unit

Sport mode - Settings: Maximum speed

Sport mode - Settings: Temperature unit

Sport mode - Settings: Max. temperature

Sport mode - Settings: Max. power

Sport mode - Settings: Max. torque

Sport mode - Settings: Max. engine speed


Long-pressing the car icon on the BC screen or the entry in the left-hand menu opens Sport mode.
(provided that it is set to 'long press on vehicle icon' in the on-board computer settings.)
functions:
- Initialisation at start (full pointer deflection)
- Display of selected values as 'instrument panel'
- Stopwatch for freely adjustable start and target speed
- Display of last times
- Fixed displays (non-sliding)
- Drag pointer for maximum value (automatic reset if no higher value is reached within 5 seconds)
usage: * Long press on the car icon on the BC screen opens Sport mode.
- Long press on one of the displays switches to the next view
- Short press on one of the displays opens the setup for the sport mode
- Back button or long press on the logo exits the sport mode
- Long press on the numerical value of the maximum values (view 1) resets the values
The values for sports mode correspond to those of the BC screen.
The images show screenshots of a BMW E39 530d with DeepOBD which is why it is possible to display the boost pressure and the higher resolution of the values for speed and torque. Without DeepOBD or in the case of a petrol engine NO boost pressure is displayed.
10The time measurement itself is very accurate. However the speed is only updated by the speedometer every 2 seconds - via GPS about every second. Accordingly this is a gimmick but not a measuring instrument.
EHC - leveling control
NOTE: This experimental feature should only be used if:
- the buffers on the rear axle (see picture below) are intact in case of an ‘emergency drive’ with the suspension completely lowered, and
- dthe start values for the offsets are set by the app ‘DeepOBD’, and
- the BMW software is available to fix any errors and the handling is clear.
We disclaim any liability for incorrect operation by the user or the consequences of using this part of our app!
There is no ‘reset’ in the case of errors! The height change rarely corresponds to the real value (even with BMW software!) and not all values are converted.
'
The menu can only be accessed by setting it to "long" or "double" tapping on the vehicle symbol in the on-board computer settings. The menu appears as follows:
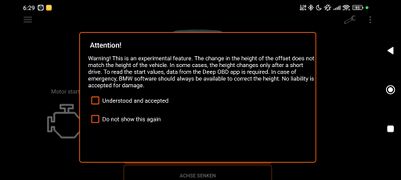
Warning for use of levelling control
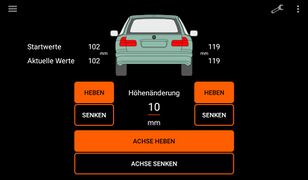
menu leveling control

menu leveling control - note: "car in motion"
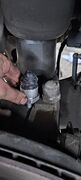
buffer rear axle


To the left and right of the vehicle image, you can see the start value loaded and entered from the app DeepOBD (with the appropriate config from the wiki). If there is a 0 here, we strongly recommend NOT to use this feature!!!
- Otherwise, enter the desired change in millimetres in the centre and then tap "raise" or "lower" to the left, right or axis.
- The function is only possible when stationary (speed "0 km/h") AND when the engine is running! Corresponding warning messages are displayed and the function is disabled.
- It is possible that NOTHING moves adhoc on the suspension and that the change only takes effect after a few metres of driving.
- In general, the function is currently only available for the BMW E39 touring and only applies to the factory-fitted air suspension on the rear axle.